How to Fix a Loose Axe Head (And How Not Too)
Through collecting axes I’ve come across lots of funny ways people have “fixed” loose axe heads – but in reality, you don’t have many options of how to do it right.
To tighten a loose axe head, you need to create pressure inside the eye so that the wood handle presses against the inside of the axe head. This can be done with metal wedges, nails, screws, or oils. These fixes are easy and can last for years. But if the issue persists it may be time to rehang the axe.
It’s important to try and fix any wiggle or movement in an axe as soon as you notice it. The more the axe is used while loose, the worse the problem will get. If the head is moving, it will impact the front of the handle – compressing the wood and loosening the head further with every swing.
You can only fix wood-handled axes, there isn’t much you can do if a composite-handled axe if it comes loose.
This is just a hobby, but if you buy through a link I may get a commission that supports the site. Thanks!
Start with Boiled Linseed Oil
Oil alone likely won’t fix a loose axe head, but if it’s a very small wiggle it could.
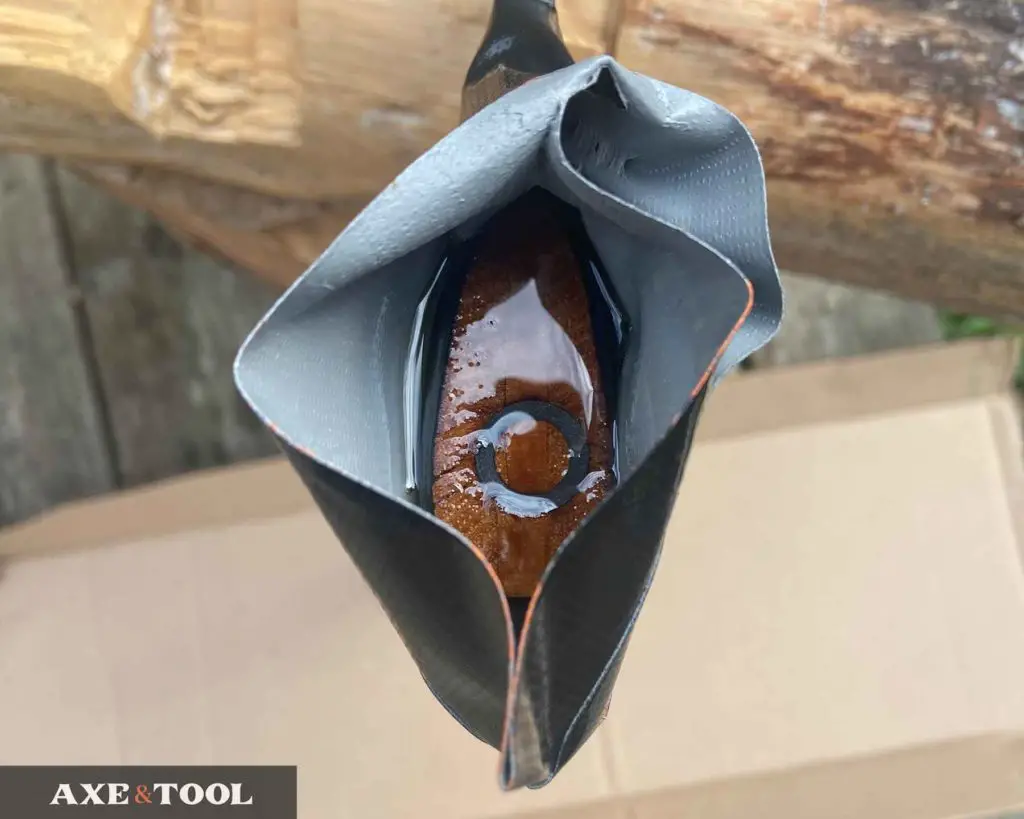
As the oil soaks into the handle it can expand the wood fibres. But it’s best to soak the eye in oil to prevent cracking when installing a wedge as well. This could be any wood oil (tung, Danish, etc), but boiled linseed oil (BLO) is the standard.
I typically create a “cup” out of duct tape and repeatedly fill it with oil until the handle stops absorbing it. The end grain at the top of the handle will act like a straw and absorb it quite quickly at first.
But you can also figure out ways to stand the axe so it’s sitting in a container of oil as well.
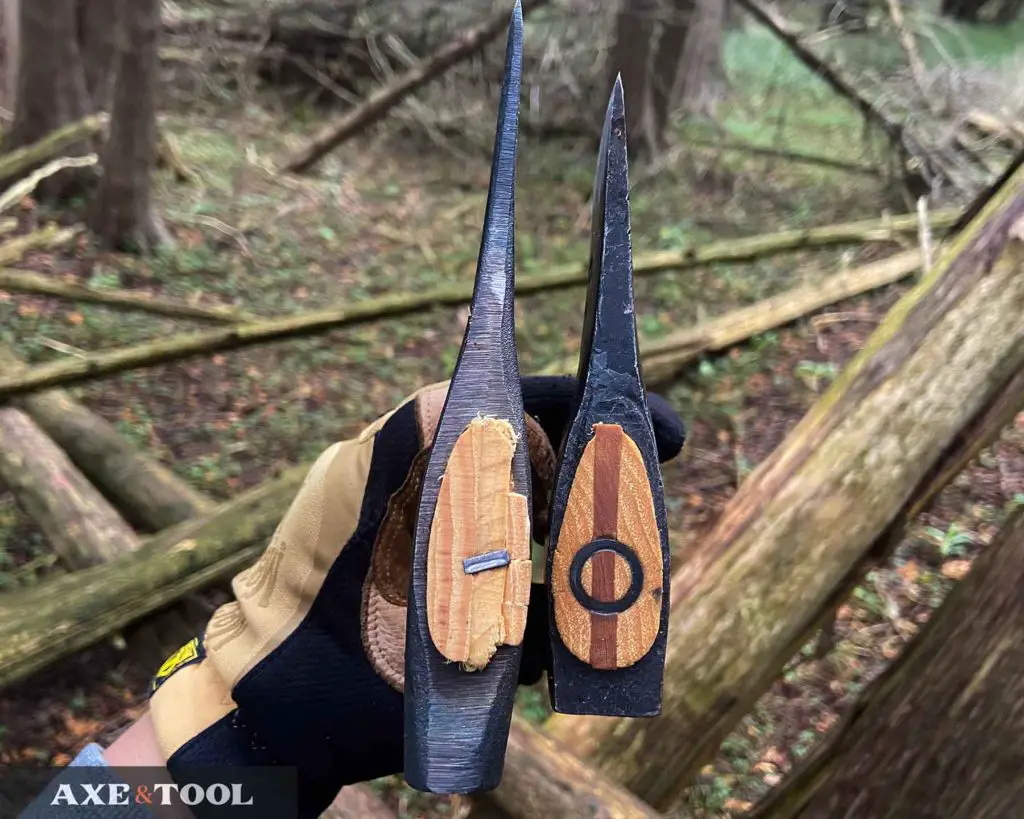
Metal Cross-Wedges for Axes

Step or Barrel wedges are designed specifically for this purpose. The wedge will dig in and for the wood in the handle in all directions. I like step wedges over barrel wedges, but they both do the same thing.
If you go to the hardware store you will likely only find kits that also include a wooden wedge, but you can buy bulk packs for cheap on Amazon (like this one).
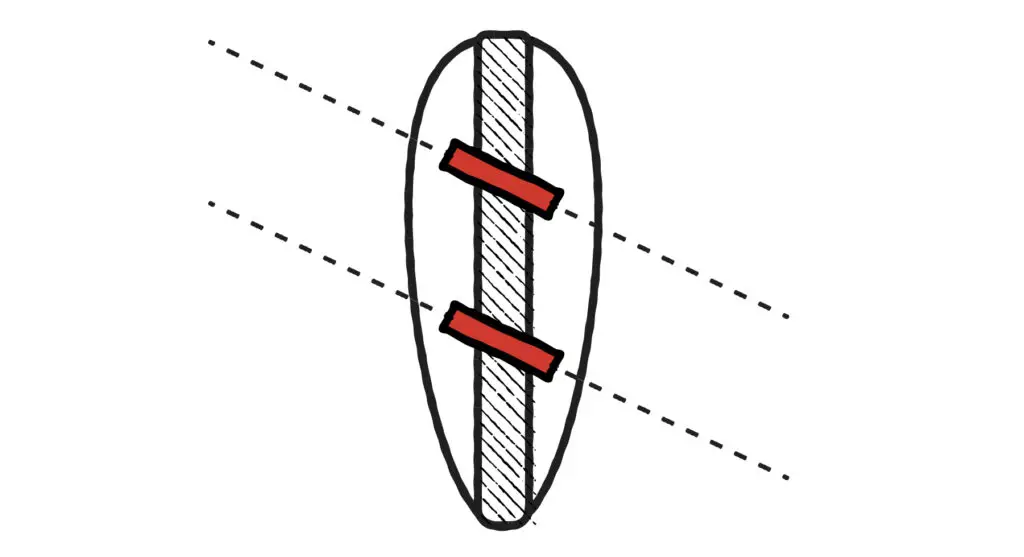
I typically use a #3 step wedge for full-size axe eyes (1/2″ or 15/32″ wide). But there are larger or smaller as needed. You can place a single wedge in the middle, or two edges for extra pressure.
Step-Wedge Size Chart:
| Size | Width | Length |
|---|---|---|
| #3 | 1/2″ (15/32″) | 1 -1/16″ |
| #4 | 3/4″ | 1 -1/16″ |
| #5 | 1″ | 1 -1/16″ |
How to install a step wedge:
- Oil the eye with boiled linseed oil to prevent cracks
- Place the wedge at an angle to disperse pressure when installed
- Hammer the wedge most of the way in
- Use a punch for the final strike to avoid hitting the wood
There are different sizes available depending on the size of the axe you have and how much room you have to work with.
Most axes today come with a metal wedge installed at the factory, which can make it difficult to add more.
Pro tip: If you have the ability, add a notch into the side of your step wedge before hammering it in. This will make it easier to pry out if and when you need to re-hang the head.
Nails, Screws, Coins All Work
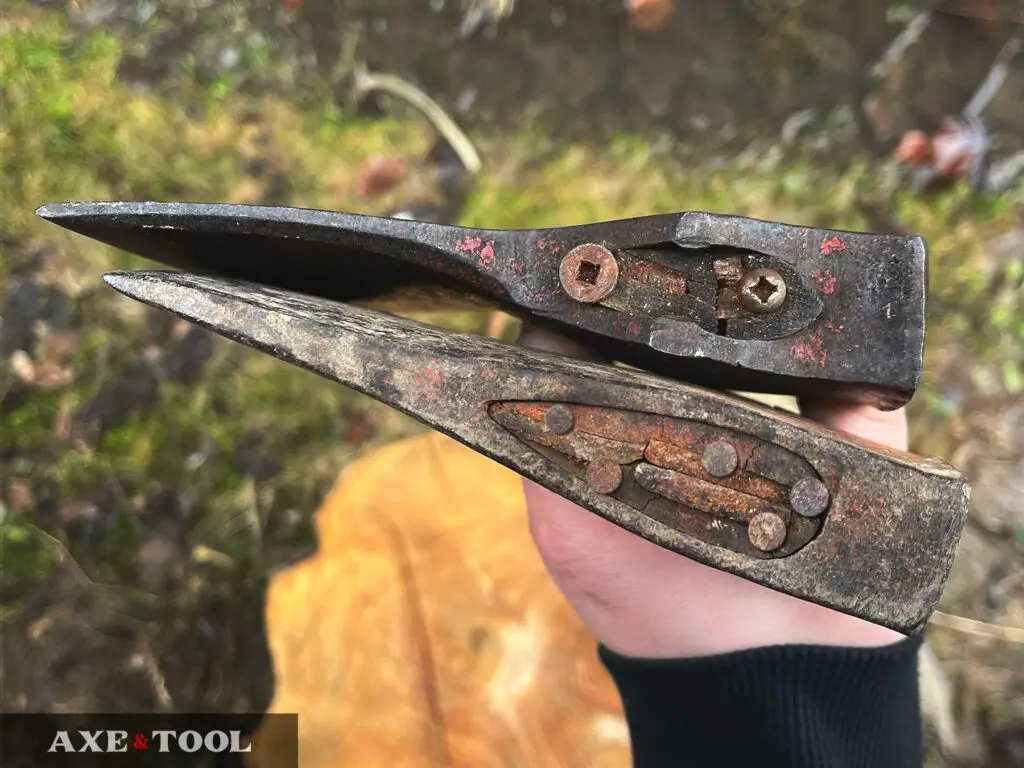
If you don’t have step wedges on hand, and so it’s totally fine to improvise. I have seen pennies, dimes, washers, and odd-ball pieces of metal used – and often they do the trick.
Nails are by far the most common filler used instead of a wedge to tighten an axe head. Everyone has them already, they are long, and they can fit around existing wedges easily.
The only downside is a single nail won’t add that much pressure – so often you need to add 2,3,4 or more.
Screws can be used – and are usually thicker than nails (adding more pressure). But I don’t use them because they are harder to get in all the way. You will usually end up with a portion of the screw popping out the top. But, if you have a bench/angle grinder you can take the top off and make it flush.
Swel-Lock Oil Fix
Skip the BLO for this one, but you can apply this in the same ways mentioned earlier on.
Swel-lock is a product designed specifically to expand wood grain. It was designed for fixing things like old wooden chairs but it can do a great job of expanding an old axe handle and tightening the head. See here on Amazon.
There are also instructions out there for how to make your own out of antifreeze – but I’ve never tried it.
You Can Use Water in the Field
You can soak the axe in water for short-term swelling of the wood to tighten the head. This should only be done if you are out in the field and can’t fix the axe properly before using it.
When you swell the wood with water the fibers will shrink again as the wood dries, and can lead to more dramatic damage as the evaporating moisture can leave the handle more dried out than when you started.
And if the handle repeatedly swells and shrinks it can damage the fibers in the wood – making it even more loose.
If you do have to do this in the field just make sure to heavily oil the eye as soon as you return, and then look at any of the other previous mends to do it properly.
Don’t Use Tape
I have got so many axes over the years with duct tape being used in one way or another to help hold the head into the handle.
Don’t do that. It’s not going to work, and it’s going to make everything more dangerous since it becomes hard to tell how loose an axe really is, or if the handle is broken.
If All Else Fails, Re-hang the Axe
You are going to hit a point where there isn’t room for any more nails or wedges. Or sometimes the handle is just shot. That’s when you will need to rehang the axe.
If the handle is in good condition you can sometimes get the head off, smooth out any damage, and rehang the head – however, usually you will need a new handle.
I have separate articles on how to remove an axe head and where to get good axe handles.
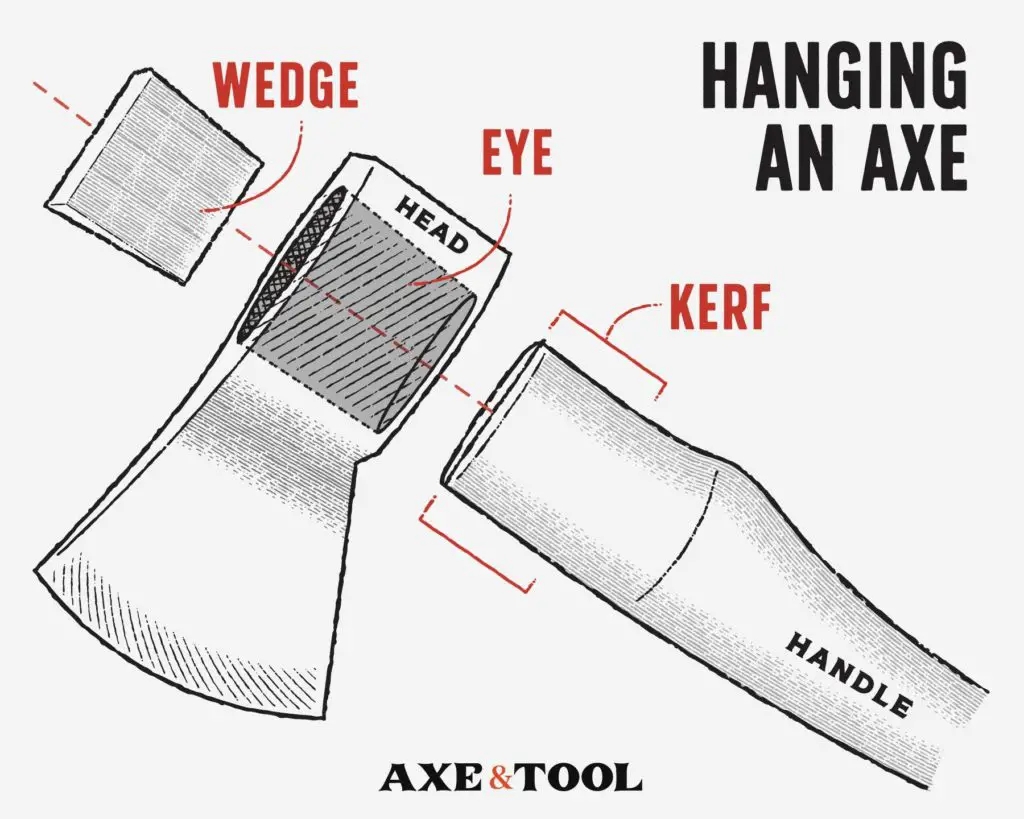
How to Re-Hang an Axe
The key to hanging an axe head is to shape the handle to fit the eye snuggly, without sitting on a ledge. If the head is sitting on a ledge it will start to loosen the handle again quickly as the wood fibers get compressed by use.
1. Choose a handle: Select a handle that is the right length and width for your needs. The eye (end of the handle) should start slightly larger than the hole in the axe head.
2. Fit the axe head: remove material from the handle eye with a drawknife or rasp until the axe head fits onto the end. It should fit snugly and be centered on the handle.
3. Secure the axe head: Once the head has been fitted a wood wedge is hammered into the slot at the end of the handle (the kerf), pressing the handle against the head locking it in place.
Then if you want, you can do any of the steps from earlier to lock the handle into place even tighter (like by adding metal wedges).
Once you are done, be sure to fully oil your handle (see how to here) and store it properly (full guide here) to keep it strong, and reduce the chance of the new handle loosening.
Please comment below If I missed something or if you have any questions. I do my best to respond to everyone.
About the author:

About the author:
Jim Bell | Site Creator
I’m just a guy who likes axes. I got tired of only finding crap websites, so I set out to build a better one myself.
I’m also on Instagram: @axeandtool

Hi Jim,
I just discovered this website and I love the information….I am realizing I have a lot to learn :). I have a Dave Canterbury American Felling Axe I got about 2 years ago (and unfortunately stored in garage until now after reading your website, I live in New Hampshire with cold winters).
I have been working on a large pine tree that fell on our property for past month or so and I just noticed the head has slid up about 1/2cm along the haft. Now the metal head is above any wood, but it doesn’t appear loose, at least not to the point where I can wiggle it myself. Aside from starting to oil it and store properly would that be something I should consider “loose” and take one of these steps here (I would probably use nails)? Thank you 🙂
Hey Michael, even if it’s tight now – it certainly came loose to move that far up the haft. It’s probably still safe to use, but I would try and fix it (better safe than sorry).
What you can do is:
1. Sand any visible ledge where the head used to sit, so you can get a new tight fit
2. Turn the axe upside down and whack the bottom of the handle with rubber or wood mallet (not metal), to reseat the head on the shoulder.
3. Add wedges, metal (whatever you want) to tighten the hang
4. Oil that sucker like crazy
Hope this helps
Ok great!! thanks so much. I will give all that a try. I appreciate it.
Hi Jim,
It worked wonderfully!! thanks so much
Wicked! Glad to hear it.
Hello Michael, I have a storage question for axes. I live in western Tennessee. My shop is built on a concrete slab, but due to type of construction, adding drywall and insulation to attic/ceiling would be difficult. I try to keep the windows closed when humidity is high, which is most of the time. In your opinion, what is the best way to keep my axe heads and other metal tools from rusting? I’ve tried cleaning the heads really well and then spraying shellac on the metal to keep from oxidizing, but this only works for a while. I feel there must be a better way to protect the equipment. Any recommendations would be greatly appreciated. Thanks.
I have had good luck using paste wax (axe wax), it goes on thicker than oils and can be rubbed into the nooks and crannies (it’s good for wood too). Like anything, it will need to be reapplied with use.
Another thing that can help is tool bags, or even just covering them with a towel or fabric cover. Some sort of barrier that stops most of the moisture in the air from settling on the tool. This is especially helpful stopping condensation during temperature changes. Although it can be a little annoying, and doesn’t work with every setup.