How to Custom Paint an Axe Handle
A well-painted handle on an axe can be a thing of beauty. And luckily, it’s not hard to do a nice job. It just takes a bit of care and a bit of time.
For this article, I am going to be using spray paint, but the same process will work for other types of paint as well.
This is just a hobby, but if you buy through a link I may get a commission that supports the site. Thanks!
What you need:
- Decent Spray Paint (Rustoleum)
- Blue Painter’s Tape (0.70″ ScotchBlue)
- 100-grit Sandpaper (Fandeli bulk packs are good value)
- Plastic wrap, butcher paper, or newspaper
Additional options:
- Gloves to keep clean (I like nitrile)
- Boiled linseed oil for the handle (any brand)
- Spray Varnish (gloss or semi-gloss)
Tip #1: Don’t cheap out on the paint
You don’t need fancy paint, just the standard name brands. But don’t use the cheap off-brand spray paint. There IS a difference, and I’ve found out the hard way. It can be flaky, bubbly, and inconsistent. I use Rustoleum Painter’s Touch.
I typically use a glossy finish, it’s smoother, stronger, and isn’t affected by masking tape if you are doing a design. Matte finish can get you a more “vintage”,
Tip #2: Get the right tape
You need the blue painter’s tape and not the green. The blue is designed to produce a clean edge. Anything else will let the paint bleed under, and you will get a “fuzzy” edge (or worse).
I like using the thinner 0.7″ width (this one), as it’s easier to keep a consistent line around the curves of the handle. 1″ is also fine.
Step 1: Sand the handle
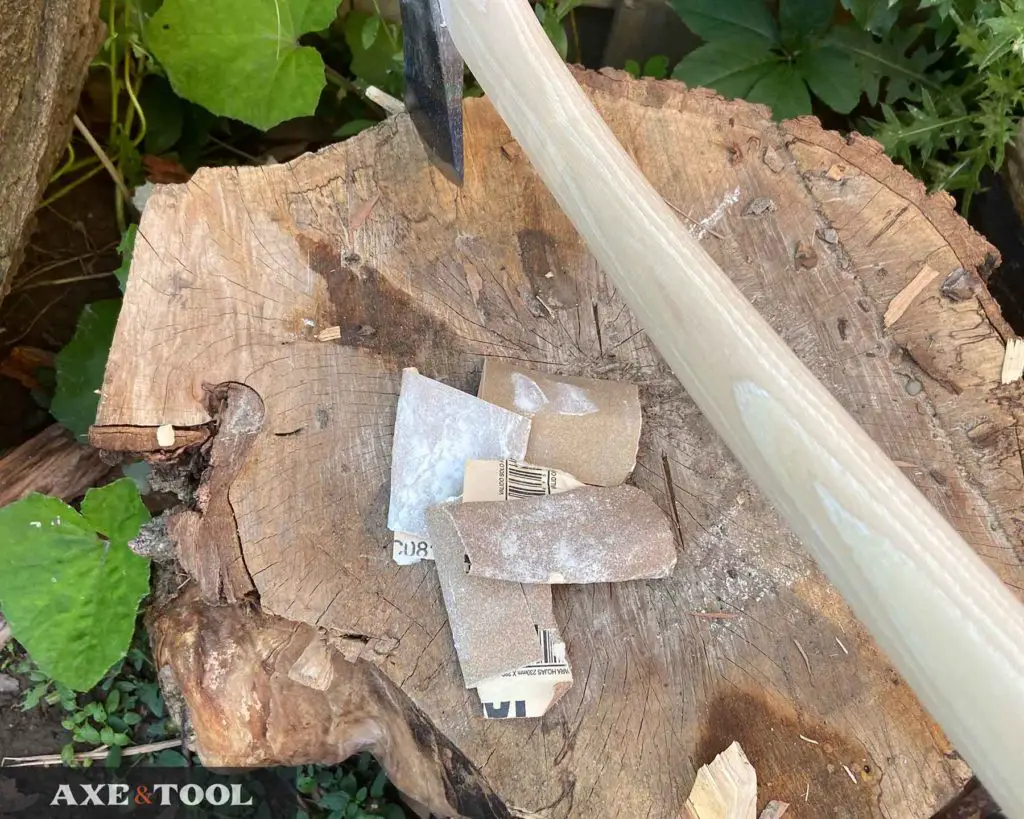
Use 100-grit sandpaper to prep the area of the handle you are going to paint.
If you are painting an old axe with a well-oiled and broken-in handle: just sand the area you are going to paint. You don’t want to ruin the existing finish, but the paint needs a little texture to adhere properly.
If you are painting a new axe handle: You may just want to sand the entire handle. I like to sand the rest of my handle (that won’t be painted) with 220 grit for a smooth finish. It’s easier to do it now before you paint.
Fandeli bulk packs are a good value – and they have a multi-grit option.
Tip: If you are using 220 grit sandpaper, sand just a little bit past where the paint will stop. A smoother surface at the edge of the mask is key for avoiding the painting running.
Step 2: Oil the handle (optional)
I like to add a single coat of boiled linseed oil to the whole handle before painting to keep the wood strong. But the oil needs 24 hours to dry, so only do this step if you are going to give it the time. If you rush or add too much, the oil will stop the tape and paint from adhering properly.
Wipe a thin coat of oil over the entire handle. Let it sit for 5 minutes, and wipe away any excess with a dry cloth.
Once the painting is done, you should still properly oil the rest of the handle (instructions here).
Step 3: Mask the handle
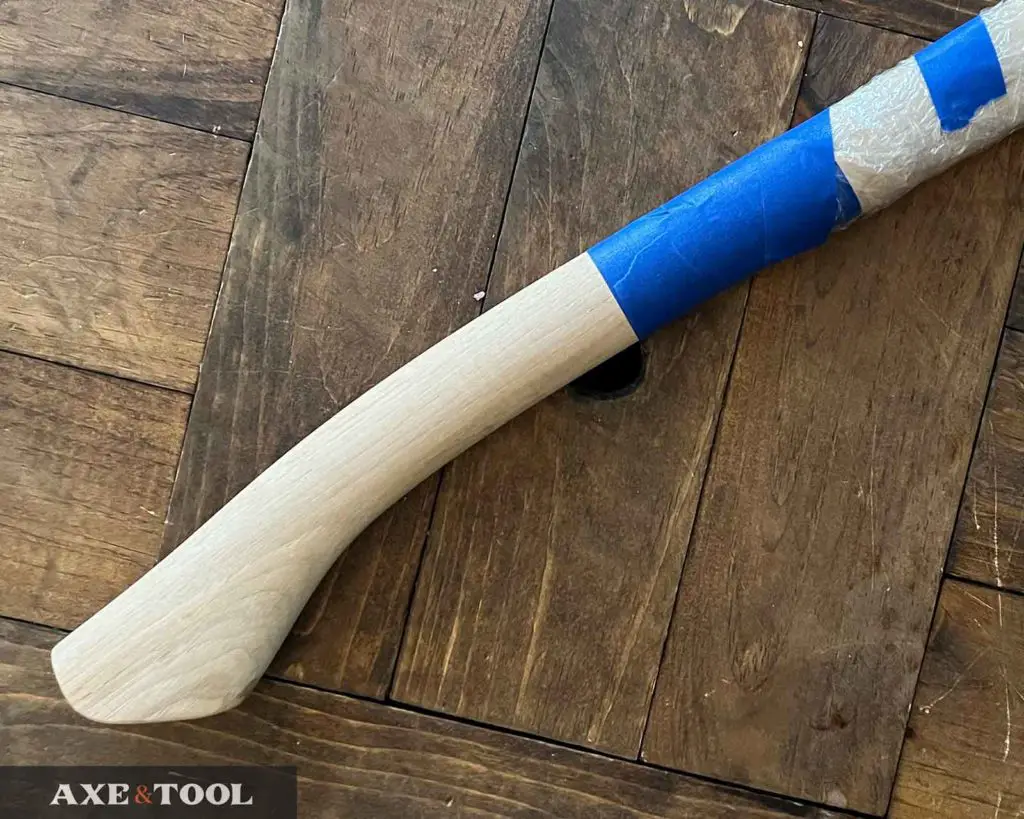
Start by creating the edge of your mask with tape to establish what will be the painted area.
Mask off the area you want to paint with blue painter’s tape, covering everything you. Even if you are doing a design, start by masking around the full “paintable” area so you can lay down a base coat.
I typically use tape for a few inches above or below the area and then cover the rest of the axe in plastic wrap or butcher paper (rather than wasting taping on the entire thing).
Tips for success:
- Use a single piece of tape to create the mask edge
- Push down around the edge for the best seal
- Examine the mask from front and back to ensure it’s symmetrical
Step 4: Staining the axe handle (optional)
If you are staining the handle, do it before you add any paint. You can even use stain as a layer within your painted design.
Hickory is quite hard and doesn’t take stain all that well in my experience. But I still do it from time to time. Simply wipe on the stain, and give it time to dry.
Step 5: Apply a base coat
Your base layer of paint is going to even out the surface, filling the grain in the wood and ensuring a consistent finish.
If you are just painting a single color – just use the color.
If you are painting a design/pattern start with the brightest/lightest color first, or start with white as a prime coat.
To ensure you get a consistent and smooth finish, spray on a light coat of paint, don’t worry if wood still shows through. Give it about 30 minutes to dry (follow instructions on the can), and repeat 3-4 times as needed.
The key when painting the handle (at any stage), is to spray on very thin coats, multiple times. If the paint goes on too thick, it can soak under the tape and create an uneven and weaker finish.
If you are doing a multi-color design, you can lightly sand between coats with 400-1000 grit sandpaper to avoid too much build-up. This while filling any tiny small cracks in the grain with paint – creating a very smooth even surface.
Allow the finished base coat to dry for 12-24hrs. It will be dry to the touch much sooner, but it’s best to give it time proper time to fully harden for a more durable finish.
Tips for success:
- Spray from about 12″ (30cm) away, quickly and lightly covering the area.
- Start spraying off to the side of your handle, and then bring the paint to it once you have started. When you first press the nozzle, the spray can be uneven and send out flecks and air bubbles that will impact the finish.
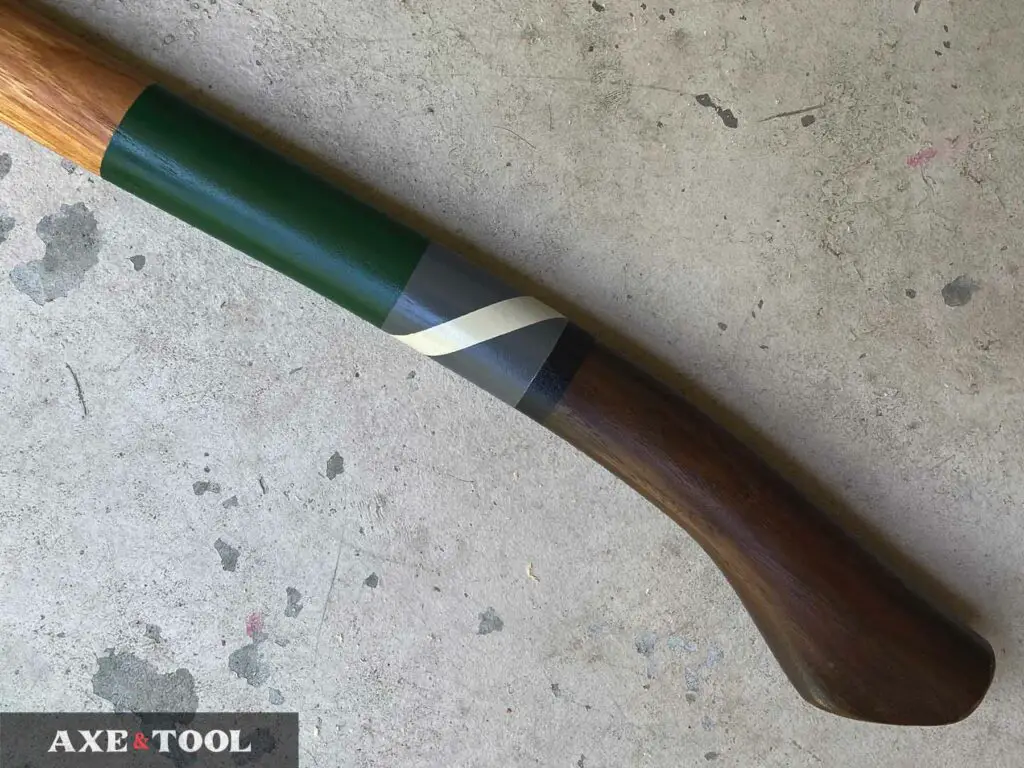
Step 6: Custom designs
With your first color or base coat applied you can start to build a design on top. While you still should use a light coating of paint, these layers should be much quicker.
You have to think about adding the new colors strategically in the right order to save yourself the trouble.
It’s still best to allow a full dry time between each color, but if you work carefully you can add the next mask layer after an hour or two of drying (if the paint was applied in thin layers).
Apply the colors from lightest to darkest
Start with the brightest colors first and get progressively darker. That way you can simply paint over the existing colors, and possibly re-use existing mask lines for multiple colors, rather than butting up masks against each other.
If you butt up masks against each other, the result is a more noticeable seem (visually and to the touch) and it will open up more chances for errors/bleeding.
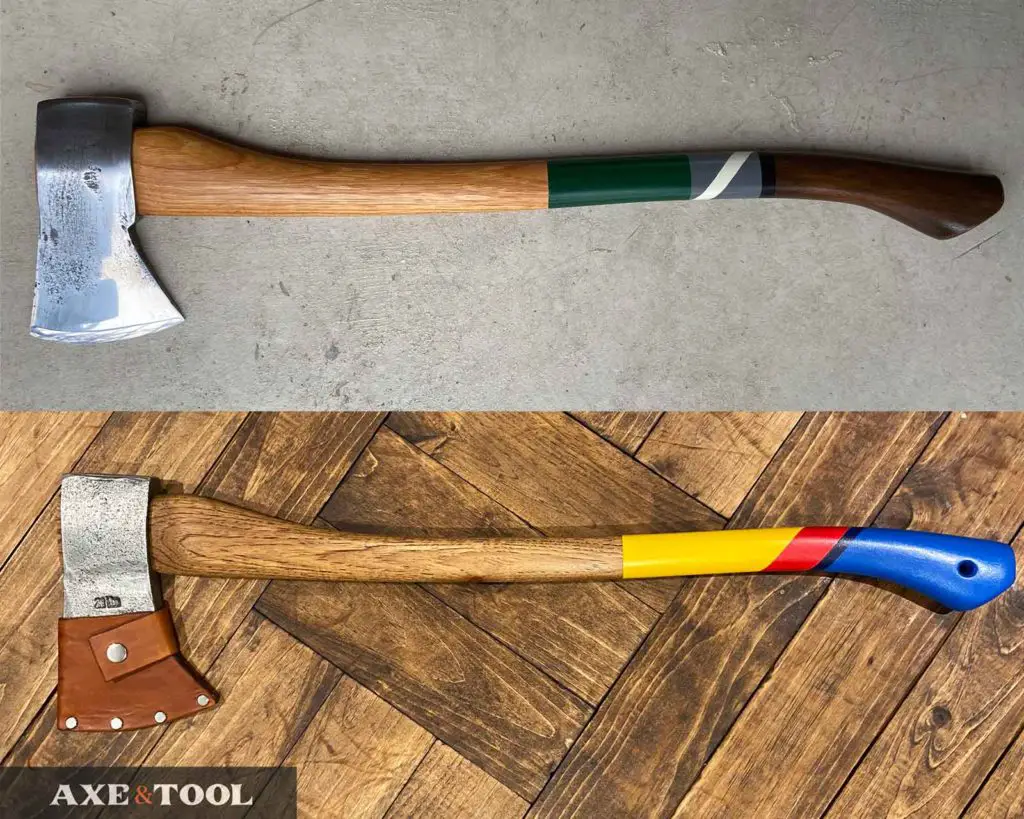
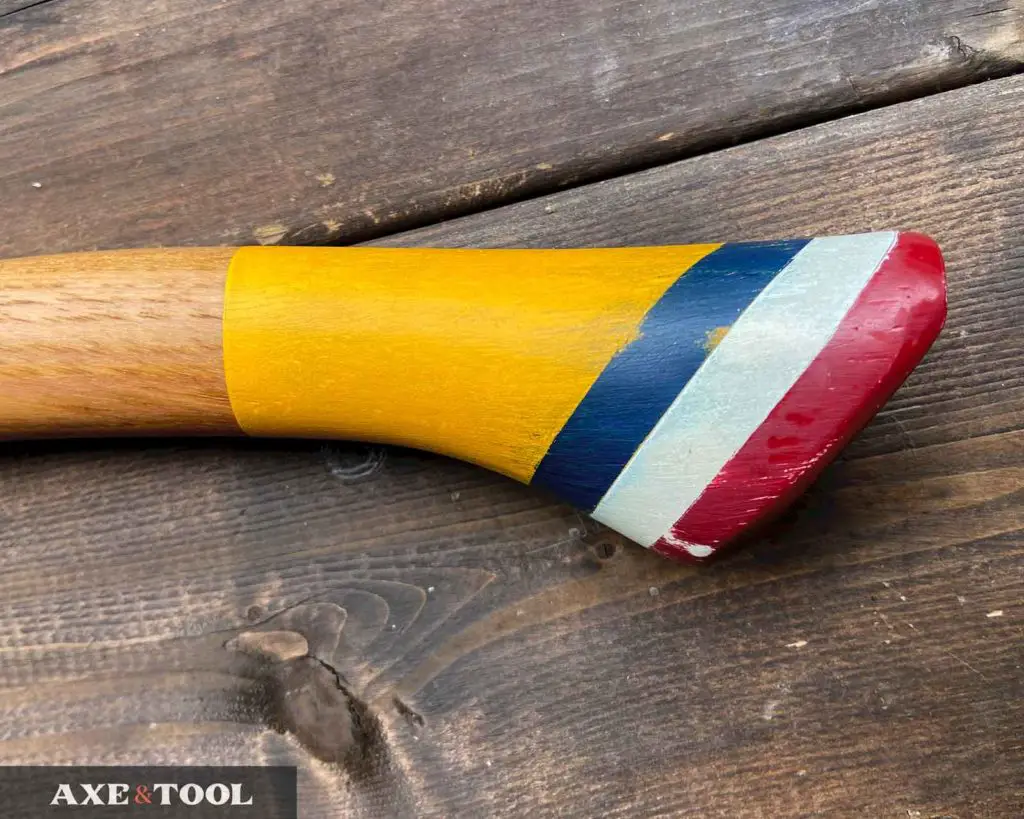
The steps below show how I would approach a multi-color design (like the one in the first picture).
Process example 1:
Layer 01: In this example, the base coat was yellow and I covered the entire bottom of the grip.
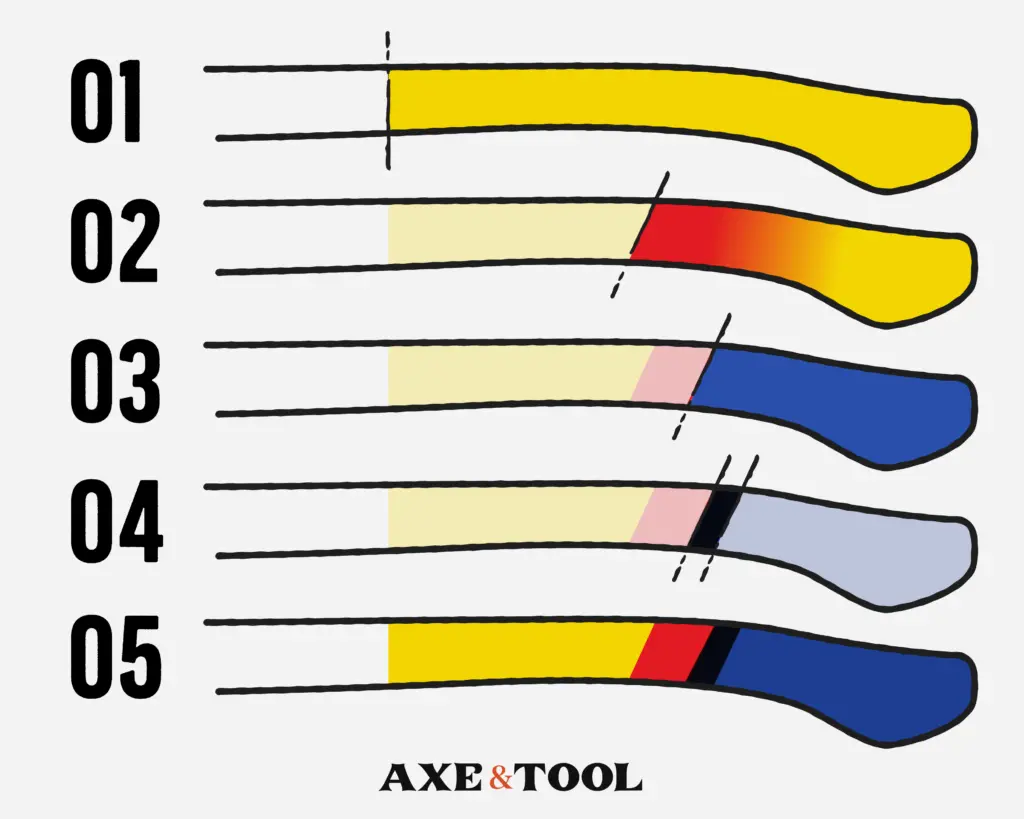
Layer 02: When I added the red, I only masked over the yellow portion, and let the red fade down into the area where the blue would be. Because the blue is darker, it covers the red just fine.
Layer 03: I masked everything that was not going to be blue.
Layer 04: Leaving the original blue mask in place, I then added a second mask to frame the thin black line.
Layer 05: Remove the masks and you are done or ready for a spray varnish (more on that in Step 6).
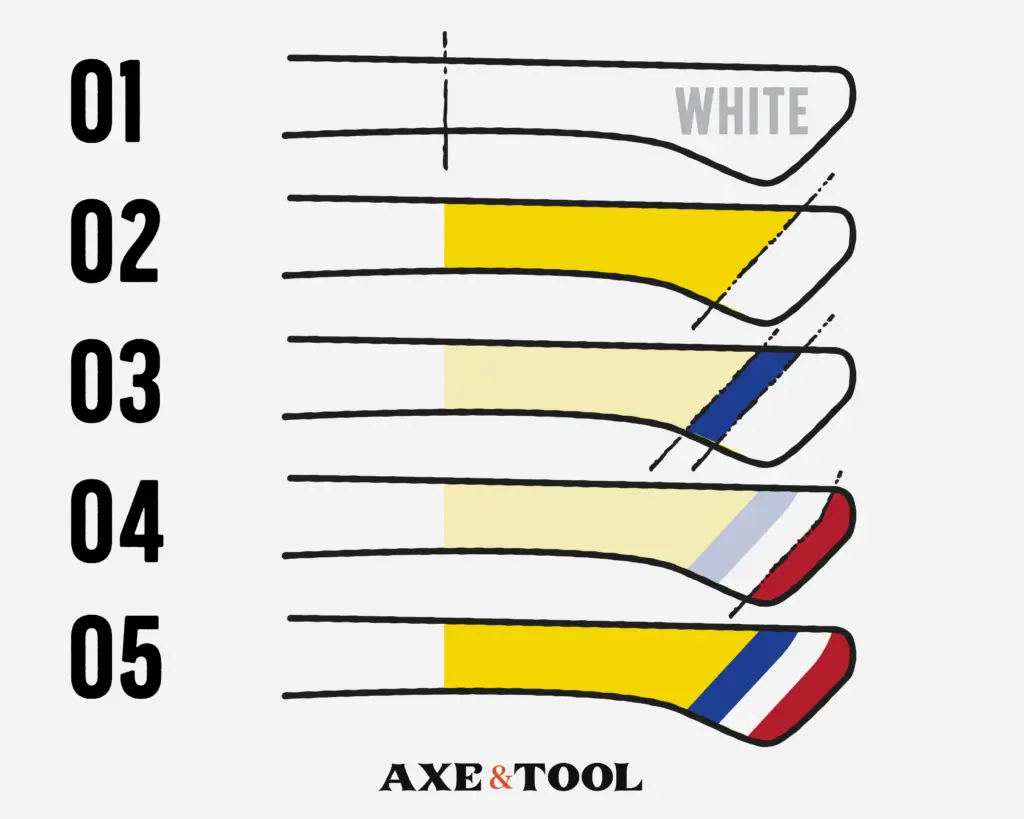
Process example 2:
Here is another example of the color application process, following the same principles as above.
Step 7: Optional finishes
There are a couple of final steps you take to finish the handle, but these are optional.
Varnish for extra protection
Spray varnish will add extra scratch and chip resistance, and give the different layers of paint a slightly more uniform feel and finish look. I almost always add this layer to finish off a project.
Do not varnish the rest of the exposed wooden handle. It should be properly oiled after the painting the painting is done to keep the wood strong (full instructions here).
Softened & distressed
Even though I usually varnish the paint, it actually feels better in hand once the shiny layer of the paint has worn off, leaving the texture feeling softer and a little tacky (which I like).
You can pre-distress the paint with extra fine sandpaper (400-1000 grit), which will pull off the shine, add some scratches, and give it a soft feel and vintage look.
But it’s more satisfying (in my opinion) to “earn” the wear and tear in the field.
Please comment below If I missed something or if you have any questions. I do my best to respond to everyone.
About the author:

About the author:
Jim Bell | Site Creator
I’m just a guy who likes axes. I got tired of only finding crap websites, so I set out to build a better one myself.
I’m also on Instagram: @axeandtool

I have a fiberglass axe and I would like to color it any suggestions?
I have never tried it – but usually you need to roughen the surface of plastics and composites for the spray paint to adhere well. So maybe a course sandpaper? But that’s just a guess.
Great tips, thanks!