How to Oil Finish an Axe Handle (for the best results)
I follow this process for finishing both new and restored axes before putting them to use. It creates a durable, silky smooth finish that protects it from moisture and keeps the wood strong.
It is the closest way I have found to create that same feel of a well-used vintage handle (without years of hard work).
To properly oil an axe handle, first scrape off any varnish, sap or dirt and sand to a smooth finish using 100 and 220 grit sandpaper. Next apply a hardening oil like boiled linseed oil once a day for a week, lightly sanding between coats. This will quickly build up a smooth protective coat.
What you need:
- Knife (for removing varnish)
- 100 & 220 Grit Sandpaper
The brand doesn’t matter but I like these bulk packs: 100g & 220g. - Lint-free cloth
I use blue shop towels (amazon) - Boiled Linseed Oil
You don’t need much, 32oz (1L) will last years.
Brand doesn’t matter (amazon)
Optional extras:
- 400 Grit Sandpaper
- Rubber or Nitrile Gloves
- Duct tape
- Axe wax
Choosing a wood oil for handles
For anyone getting started I would go with Boiled Linseed Oil (BLO), it’s the industry “standard”. It’s a hardening oil that has a nice finish, goes on easily, dries quickly, and adds nice color. But this process will work with other hardening woodworking oils like Tung oil or Danish oil, as long as they aren’t RAW.
I’ve been loving Danish Oil – It is a polymerized linseed oil, which means it is both food-safe and fast-drying, although it doesn’t darken the wood as much (which could be a pro or a con). Unlike BLO – Danish Oil brand does matter, because many companies sell Danish Oil “Finish” which are full of chemicals, and they hide it in the fine print. I use Tried & True (amazon).
Raw linseed oil vs boiled linseed oil
Raw and Boiled Linseed Oil are not the same, but can both be used for axe handles – they just work in different ways.
I have deliberately switched to raw linseed oil for some of my axes, partly because I oil a lot of axes and I like not having to worry about the chemicals on BLO. If you are interested I have a full article on how and why to use RAW linseed oil.
1. Clean and sand the handle
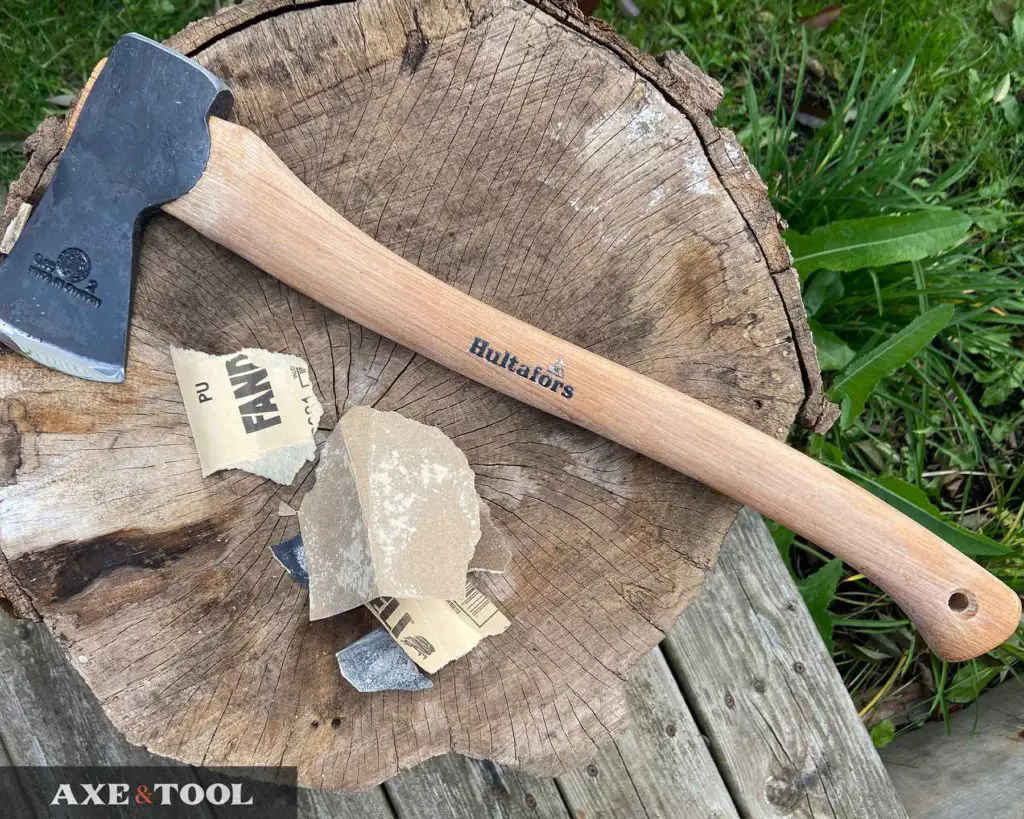
Remove any varnish or wax
If your axe handle is coated in varnish, it will need to be removed before oiling. It’s easiest to scrape it off with a knife before sanding.
Just drag the blade of a knife across the handle, and it will pull up varnish in curly strings. If you don’t do this, the sandpaper will get clogged up immediately and it will take you WAY longer to remove. I have a step-by-step article on removing varnish here.
Note: Some Council Tool and Gransfors Bruk handles come waxed. You may not want to oil it until the wax has worn off. Both will have at least one coat of oil from the factory.
Cleaning dirty axe handles:
Clean the handle if it’s dirty from use so it can properly absorb the oil. Dirt, sap, and pitch will clog the grain and prevent the oil from soaking in.
You can easily scrape the bulk off with a knife (same as the varnish removal process), or just use the 100 grit sandpaper. You don’t need to get every last particle, just clean off anything thick on the surface.
Sand the handle smooth:
Use the 100-grit sandpaper to smooth rough grain, bumps, and dents. Then go over the handle with 220 grit to give it a silky smooth feel.
A tip I learned from a US Forest Service document recommends leaving the bottom of the handle a rougher texture to help with control (100 grit only). Some old-timers would even add texture to the grip with a rasp (I like this cheap 4-in-hand).
I typically sand the entire handle with 220 grit, but it’s something worth considering.
Wipe off the dust left by the sanding, with a dry cloth, or just give it a quick wipe with your hand and you’re good to go.
Note: Do not wet the handle or wipe it with a wet cloth, the moisture will open up the grain and you will just have to sand it again.
2. Apply finishing oil to the handle
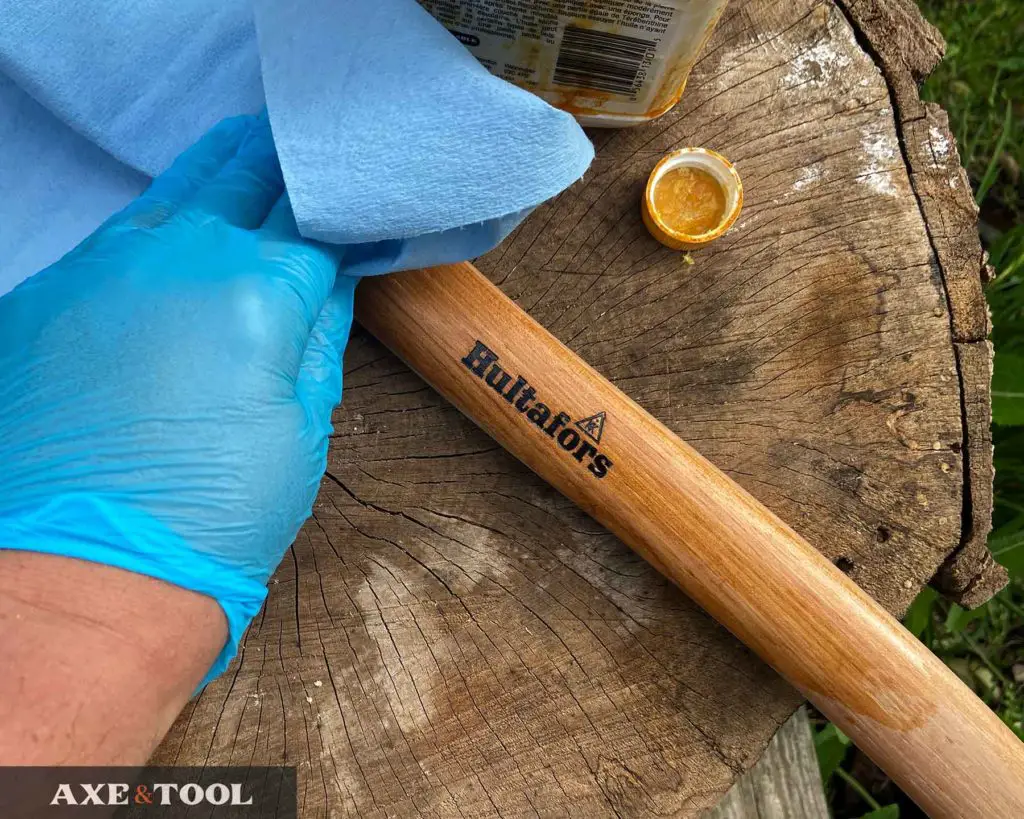
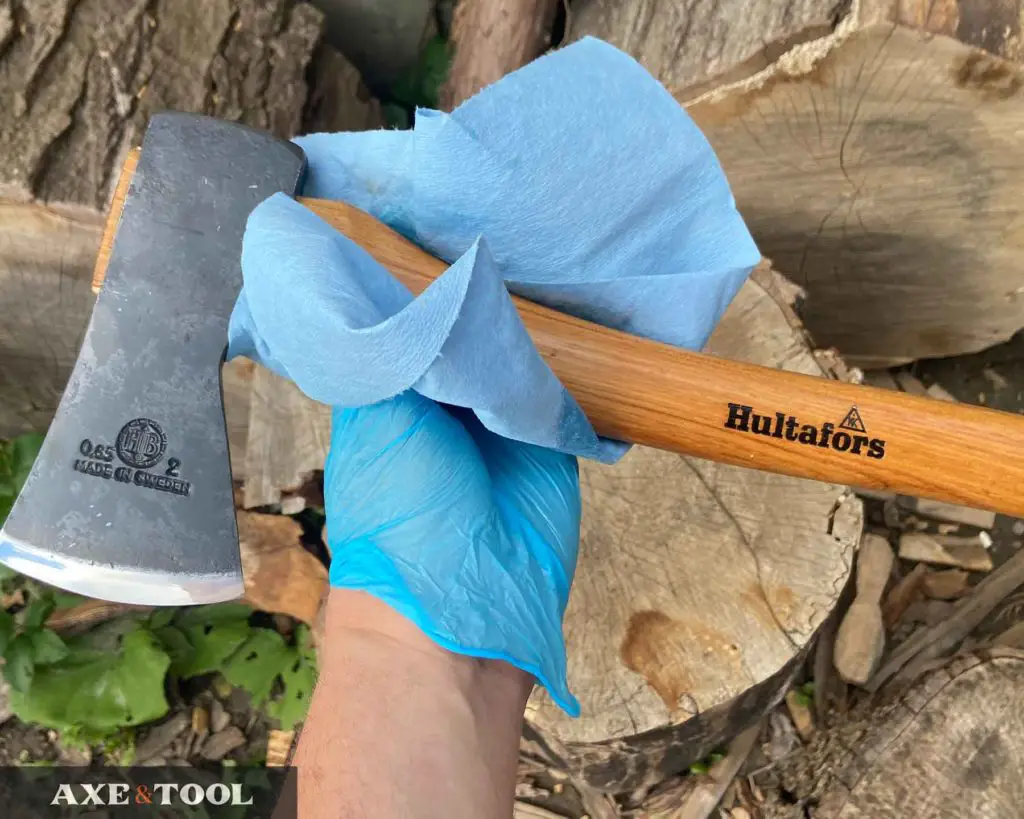
Pour a small amount of oil on a lint-free cloth, or directly on the handle. Then wipe a smooth even coat across the entire handle. It should be wet to the touch but not dripping.
Allow the oil to settle and penetrate for 5 to 20 minutes before rubbing away any excess oil with a dry part of the cloth.
For best results:
- Don’t skip wiping away the extra, BLO drys quickly and it can harden into a gummy texture if left on too thick.
- Make sure your cloth is lint-free. Any lint or fibers can catch on the tiniest bit of grain and get glued in place by the oil.
- I suggest wearing gloves as boiled linseed oil contains chemical/metallic drying agents.
- Oil the head as well – boiled linseed oil actually makes a great rust protector. It hardens and creates a much tougher barrier than typical oils like WD-40.
- Heavily oil the eye (check out Step 6 for ideas)
WARNING: Rags soaked with boiled linseed oil can catch fire by themselves. Lay them flat and/or leave them outside to dry.
Once done, find somewhere to let your axe dry.
3. Let the handle fully dry
After the first coat is applied, let the axe dry for at least 8 hours, but 12-24 is better.
Leaving the axe in the sun, or near a heat source (like a wood stove) will allow the oil to soak in more and dry faster.
Even though 8 hours is “acceptable”, don’t try and oil more than twice in 24 hours. It messes with the drying times of future coats.
4. Add at least 3 coats of oil
Three coats will do, but for the best results, you are going to want to apply 5-7 times, repeating steps 2 and 3 each time. The more coats the better it will look, feel, and protect.
Buff the Handle For an Extra Smooth Finish:
Again, this could be done only to the belly of the handle if you want to keep it “grippier” at the bottom.
Before adding each additional coat, scrub the handle with 400+ grit sandpaper or 0000 Super Fine steel wool. This will burnish (polish) the surface and fill any small holes in the grain with an oily dust mixture. As the oil drys and hardens it will create an even smoother finish.
This is a trick I learned working on canoe paddles that I have never seen anyone else mention for axes, but it makes them look and feel great.
This final buffing step may be too slick for some, especially if your handle is pretty thick (see: how thick should an axe handle be) or rounded. If you do this approach, I recommend using wax or pine tar to add a bit of tackiness back to the handle.
5. Ongoing maintenance
The common adage for oiling a handle is:
Once a day for a week
Then once a week for a month
Then once a month for a year
Then once a year going forward
Let’s be honest – most people aren’t going to stick with that. I never have been able to.
But if you oil the handle 5-7 times at the start, then once or twice a year – you should be fine.
6. Oiling tips to strengthen your axe handle
A few extra (but not essential) tips for the absolute best protection and finish level.
The top and bottom of the handle are spots that should get some extra attention. Unlike the sides of the handle, the top and bottom of the axe have exposed end grain that will act like straws, sucking the oil in.
Soaking the palm swell
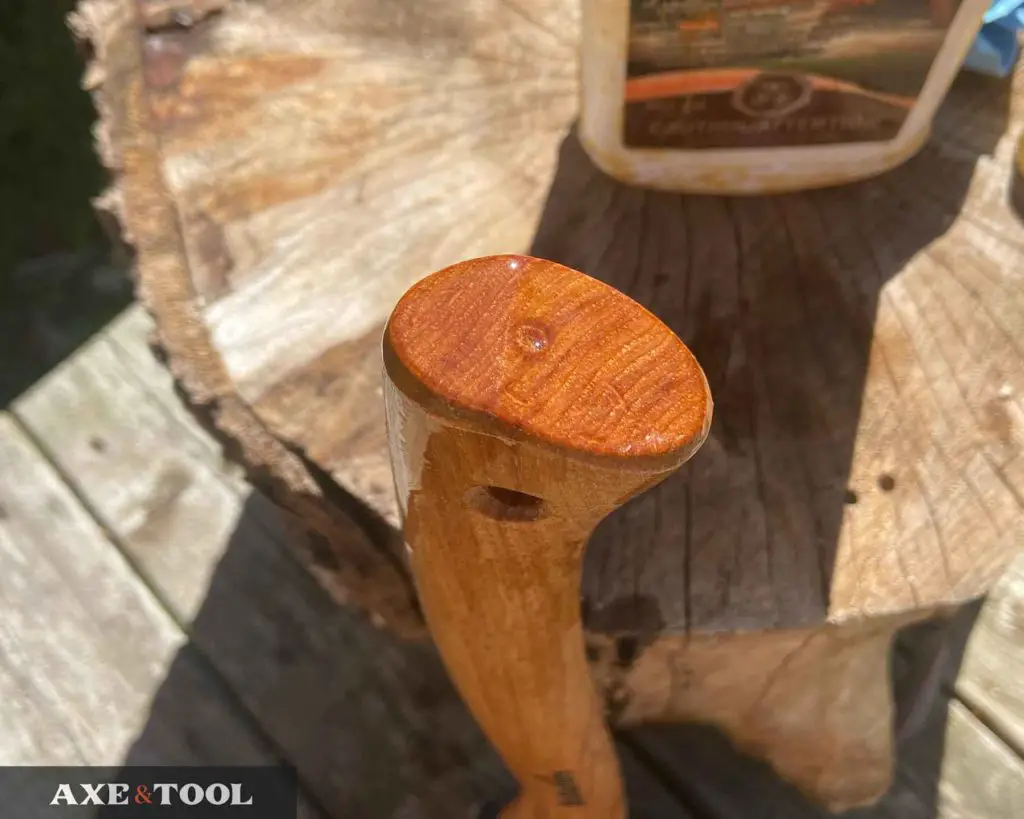
On my first or second coat of the handle, I don’t oil the eye (top) of the axe. That way I can stand the axe upside down and pour a pool of oil on the bottom.
Leave it for 30 minutes to an hour and it will soak right down into the grain.
I like to soak the bottom because it helps prevent cracks and splits with impact. I have cracked the bottom of brand-new axes just by having the swell hit the ground.
While the axe is upside down you can also pour a little oil around the bottom of the head, so it can seep into any gaps and soak the eye from the bottom.
Oiling the eye of an axe
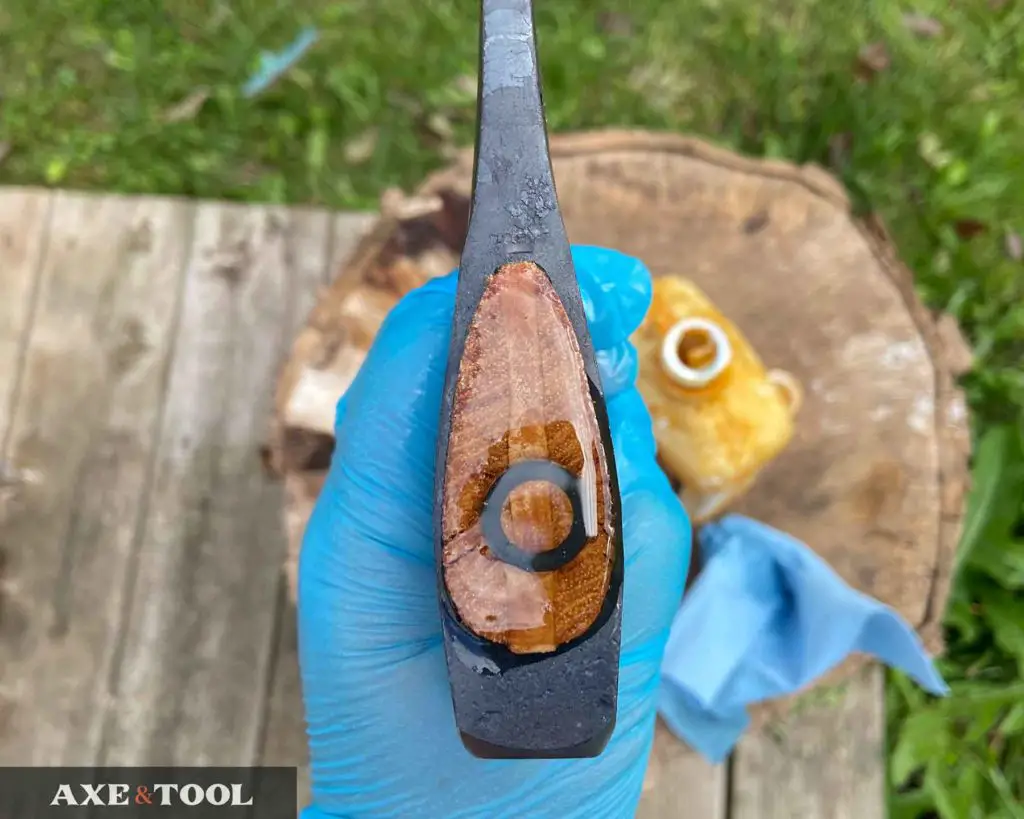
Oiling the eye is key because it reduces the chance of your axe head loosening because of temperature changes, humidity, or just aging wood.
Note: if the axe head is painted you MAY need to sand the top of the eye to expose the grain (but this is not an essential step).
A great way to oil the eye of an axe heavily is to use duct tape. Form a little cup around the eye and fill it with oil, leaving it to slowly soak in over 24 hours.
- Secure your axe vertically with a clamp or vise
- Put newspaper, a drop sheet, or a bucket under the axe
- Tape around the eye at the top of the axe head, creating a sealed ring
- Fill the tape “cup” with oil
- Leave the oil to soak in slowly
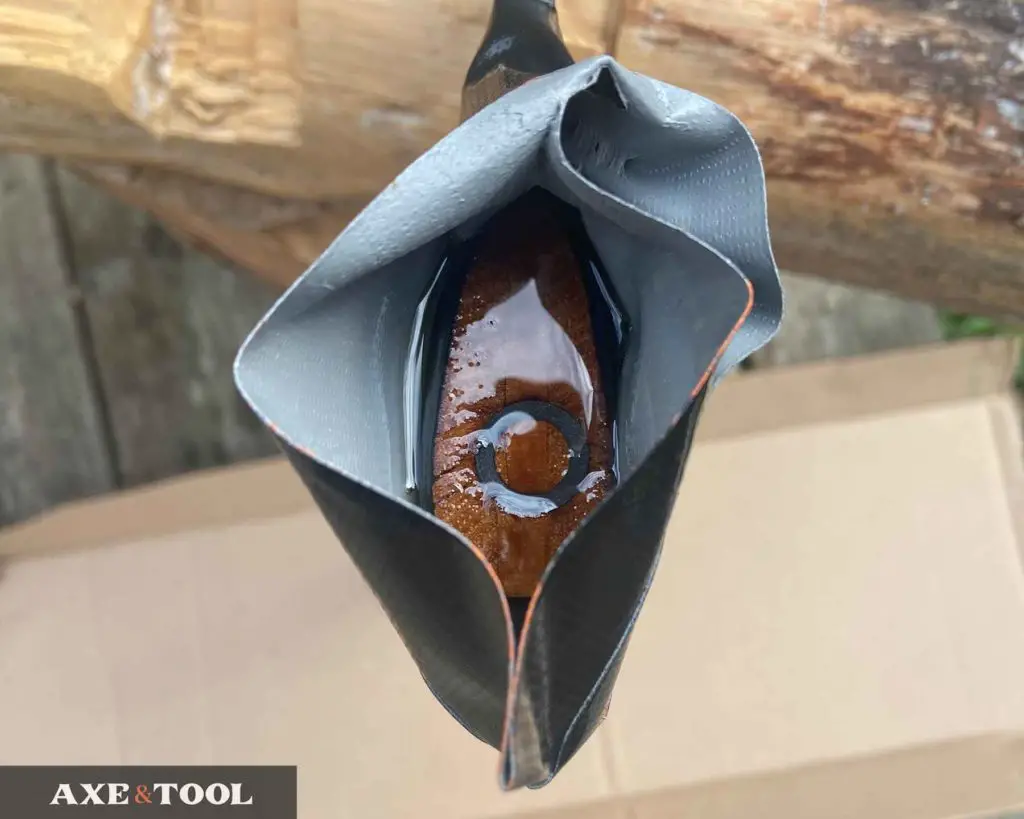
This often makes a mess, so make sure to prep accordingly. Put your axe in a bucket or on something that will absorb any running oil. Check periodically to see if any oil on the handle needs wiping up.
7. Axe wax for more protection
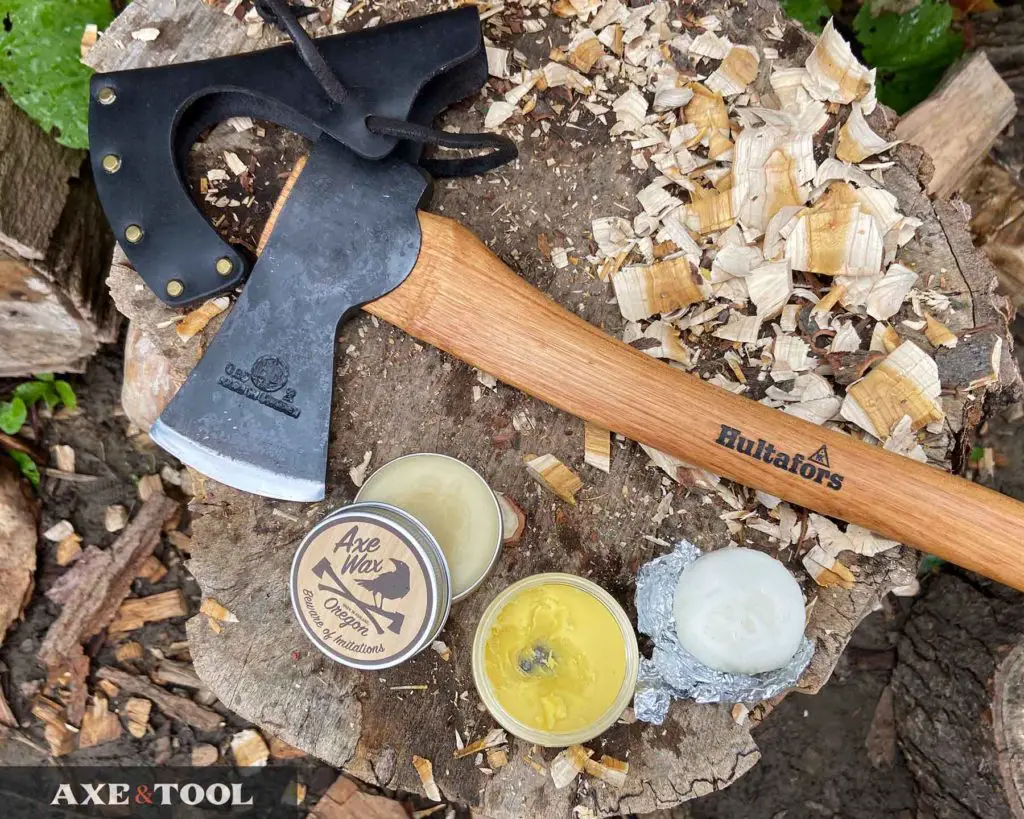
Waxing your handle after oil is not essential. If you just follow the oiling steps above your handle will already be strong and stunning. But using an “axe wax” does offer additional benefits.
Why use axe wax?
Axe wax is most beneficial to axes that are likely to be exposed to moisture like splitting axes (that often spend time in the snow), and hatchets and small axes I take camping.
Axe wax adds a hard layer of protection around the handle, sealing the oil in and keeping out unwanted dirt, and moisture. It also adds a smooth but slightly grippy texture that feels great in hand.
Axe wax can also be used as a strong rust protector on the head, and to help moisturize and waterproof leather sheaths and axe collars.
There are axe waxes you can buy, or butcher block wax works as well too. But I always encourage people to make their own. It’s super simple, costs a fraction of the price (by volume) and you can make multiple mixtures for different applications.
I have a guide to my 3 go-to axe wax recipes here.
How to use axe wax
I have a full article that breaks down how to use axe wax on the head, handle, and sheath. But the basics are very similar to the oiling process above.
- Rub axe wax all over the surface of the handle vigorously
- The heat from the friction will soften the wax and help it absorb into the wood
- Let the wax sit on the handle for 1-2 hours
- Use a cloth to wipe away any excess wax
- Repeat 1-2 times as desired
Tip 1: Consider not waxing the eye of the axe so you can still oil it in the future.
Tip 2: Use wax to plug any small holes or gaps in the hang and stop internal rusting.
Please comment below If I missed something or if you have any questions. I do my best to respond to everyone.
About the author:

About the author:
Jim Bell | Site Creator
I’m just a guy who likes axes. I got tired of only finding crap websites, so I set out to build a better one myself.
I’m also on Instagram: @axeandtool
Resources:
[1]. US Department of Agriculture, Forest Services – Forest Service Ax Manual

Have you tried odies oil vs BLO? I’ve been using odies oil and then their wax (or butter). I do like how it looks, I. Just not sure about the longevity of the protection vs a hardening oil like BLO.
Thanks again, great insights!!!
I haven’t tried Odies oil (I’m in Canada, and it’s pricy up here). I am in the middle of testing a bunch of oils for just this purpose (BLO, Danish, Tung, Polymerized Tung, and Gun Stock) for a future post. Maybe I will have to add it to the mix. Thanks for the idea/justification to buy.
Wouldn’t waxing the handle preclude any further oil from entering the wood subsequently?
It does for a while – so I don’t wax the handle until after I have fully oiled it at least 4-5 times. But, wax isn’t permanent and with use it will slowly rub off, so after a season or two (depending on use) you can oil again. I mostly use wax for smaller axes that spend more time in packs or outside in the elements – less on the big axes that don’t get as much use.
Hey, this is great information. I have a Gransfors Bruk Small Forest axe coming. You mentioned at the beginning of the article that these are already waxed. Would you recommend waiting a bit before using BLO? If not, do I need to remove the wax some how?
I would wait until it’s worn in – the finish comes quite nice from the factory don’t remove it. I’ve had mine over a year, and I only just oiled it for the first time. I didn’t scrape anything off, just soaked the eye and did a single light coat over the rest of the handle.
Although – I recently got the Wildlife hatchet, and it didn’t come waxed. So I don’t know if they have recently stopped waxing, or it’s just a difference between the models.
Greatly appreciate it. You mentioned an oil for the axe head itself to protect the metal. What was that called? Really appreciate the information you are sharing! Thank you!
When you eventually end up oiling the handle you can use the BLO as a metal protectant. But in between uses, basically any oil will do – WD-40 or Gun oil is what I use most of the time. But there are others, and some food safe options too if you are planning to use your axe for more bushcrafty/food prep stuff . I have a pretty long article about it here.
Thanks!
Thanks for your blog, nice to read. Do not stop.
Also saw on a site about putting whatever handle oil in small container full of oil,axe head down to ensure soaking around where likely to break.Maybe so?
I have done it, and it’s a great option, especially for doing multiple axes at once. Plus it will get oil into any pores in the metal (bonus rust protection). But it takes a lot of oil, and I don’t like to have an open bucket of oil around – mostly because I am clumsy and will be sure to knock it over at some point.
I recently bought a Granfors Bruce Small Forest axe and like it a lot. But I’m new to axes and don’t know a waxed handle from an unwaxed one. Just eyeballing and running my hands over the handle the wood feels mostly smooth and looks a little darker than just plain white wood, maybe due to waxing. I’d like to prep the axe right away so that it’s ready for use but couldn’t find all the answers I was looking for in the handbook. I also couldn’t find an 800 number in the manual to go over all of my questions with them. Where do you think that I should start? Let me know. Thanks.
The handle has certainly been oiled at least once – I think they soak them, and then maybe wax in addition. A gransfors should be ready for use as is. You could oil the eye as a little extra protection – but I wouldn’t do much else until you have put it so some use.
Thanks I appreciate your feedback.
Would you suggest oiling the handle before hanging? I’m replacing the handle.
I would oil after hanging. The oil soaking in will swell the wood (maybe), and make the hold even tighter. Coating before isn’t a problem – but it’s best practice to do after.
After hanging, 100%. The wood will soak up the oil and make it even tighter of a hang once you are done. Good luck, have fun!
Excellent, clear explanations with good pictures to illustrate. I wish there were more websites giving such well considered guidance as this.
Many thanks
I am very much a beginner at making tomahawks. Is using wood stain and polyurethane to finish the handle acceptable?
Oiling is less essential with tomahawks, because the handle can come off and be replaced easily. But if it were me, I would give it a few coats of oil to keep the wood flexible (you don’t need to do the whole process above). You can polyurethane after if you want.