How to Remove Varnish From an Axe or Tool Handle (with pictures)
A lot of new tools and replacement handles come heavily coated in varnish to keep them looking “nice and shiny” on the hardware store shelf. But varnish on a tool handle feels worse in hand and is actually bad for the tool long-term.
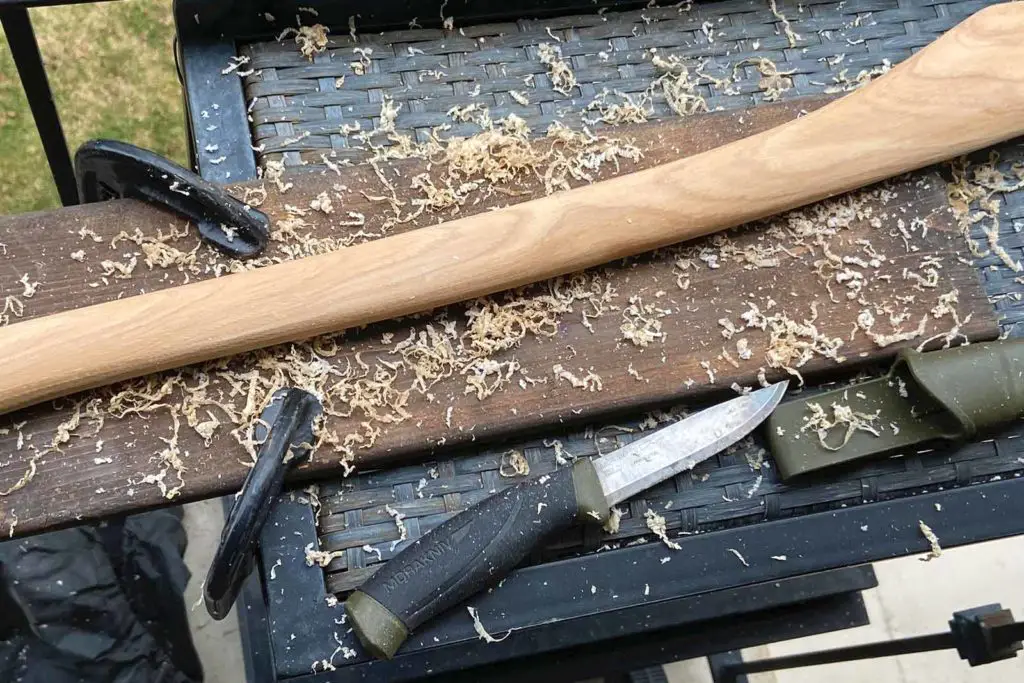
The best way to remove varnish from an axe handle is by scraping it with a knife or cabinet scraper. Drag the blade down the handle, and it will peel the varnish off quickly. Then the handle can be sanded with 100 or 220-grit paper.
Sandpaper can be used on its own, but it will clog quickly and waste a lot. I highly recommend scraping first.
Wood handles should be oiled to keep them strong and prevent them from drying out, cracking or loosening.
Summary:
Step 1: Scrape heavy varnish off with a knife
Step 2: Sand the handle smoothing any scrape lines
Step 3: Lightly oil the handle to show the remaining varnish
Step 4: Repeat until fully cleaned and oiled
It really is that simple, but I have some tips on process and finishing if you read on.
Step 1: Scraping the handle
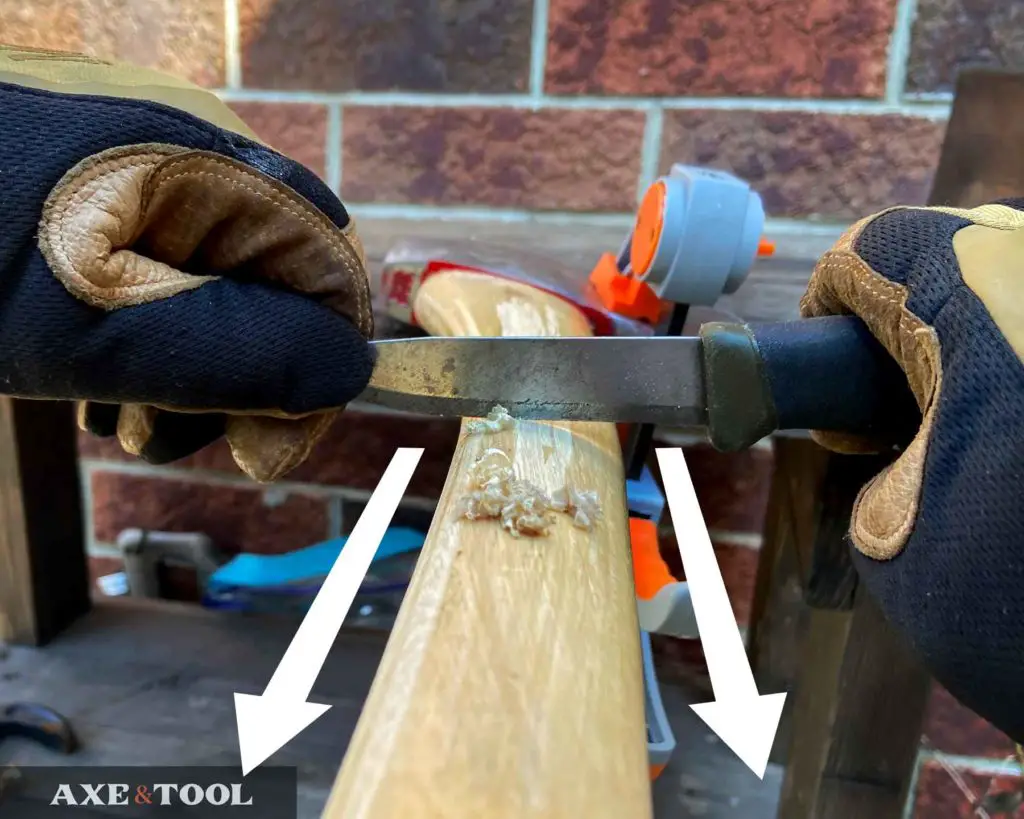
Secure the tool or handle to a workstation so that it’s sticking out and you can work around it. You can use a vise, C-clamps, or if it’s an axe you can just plant it in a log.
Lightly drag the knife or cabinet scraper down the length of the handle holding it in two hands, with the blade flat towards you. The blade should be perpendicular to the handle. The edge of the blade will scrape the varnish off in strings.
I have switched to a cabinet scraper (amazon), but honestly, most knives will do fine.
Knife vs Cabinet scraper
A knife will work very well, but takes a little more time and usually needs sanding afterward. Cabinet scrapers can pull off more material, and leave a smoother finish that may not even need sanding when you are done.
Choosing a knife: you want a fairly straight-edge blade with a thick spine to not bend when dragged sideways. Use a knife with at least a 4-5” blade (the longer the better) to avoid accidental gouges. I use mora knives as my go-to (cheap and effective).
Once you have worked your way all around the handle, take the tool/handle and turn it around a few times in your hand looking for any shiny spots you missed, or deeper grooves in the wood where varnish might be trapped.
If you see little bits of varnish, either keep working with the knife or it can be removed in the sanding phase.
Tips for painted handles:
If there is a painted end on the handle you want to keep, mask the edge with tape before you begin scraping or sanding as protection.
Then start slowly scraping forward from the edge of the tape – pushing the knife away from you. That will give you the best view, the finest edge, and will avoid accidentally scraping over the tape. Take your time around the edge – don’t rush it.
Step 2: Sand the handle
Some people like the scraped finish – if that’s you, feel free to skip this step.
Go over the handle starting with 100-grit sandpaper, smoothing out any lines or cuts caused by the scraping. The coarse sandpaper can also be used to remove any grooves in the grain that trap varnish.
Once it’s smooth and even, go over it again with 220 grit sandpaper to get it feeling fine in hand.
Note: Some “old-timers” like to leave the bottom of the handle a little rougher for more grip. So you could leave it sanded at only 100 grit.
Use a dry cloth or paper towel to wipe off all the dust and look for any remaining varnish. Don’t wet the cloth as the moisture will open up the grains and you will need to sand it again.
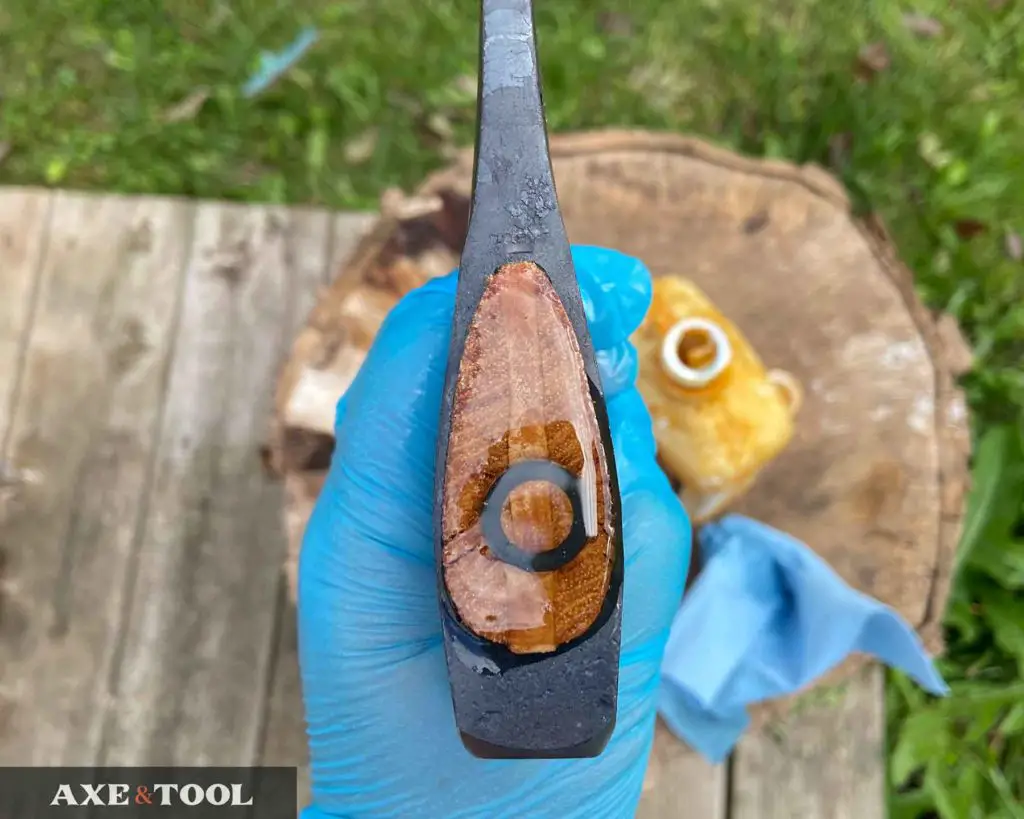
Don’t forget the eye
TRY to sand the top of the handle that sticks through the eye. You want to be able to oil this heavily. Oil at the eye will be sucked down into the wood grain (like little straws) and travel down into the head of the axe.
It might not be easy or even possible if it’s flush with the top of the head, but it’s best if you can.
Step 3: Oil the handle
When you are ready, simply wipe on a LIGHT coat of boiled linseed oil with a rag. You can let it soak for a few minutes before wiping away any excess. You should be able to see any remaining varnish as light/discolored spots almost right away.
These discolored spots will look like the oil is not absorbing (because it’s not). Often it is only in deeper grain, but it can also be splotchy areas where the varnish was absorbed more into the wood.
Wait 30-60 min for the boiled linseed oil to dry a bit more before you begin sanding again.
Tip: Hardening oils like boiled linseed oil contain metals and chemicals as drying agents, so I recommend wearing rubber gloves. It’s not a big deal if you don’t but wash your hands thoroughly after.
Step 4: Repeat
Normally you would wait longer for the oil to dry, but at this point, you can sand or scrape any areas still showing varnish to get rid of it.
The oil will clog up the sandpaper quickly, so hopefully, you won’t see much varnish but I usually find a persistent spot or two that I have missed despite my best efforts.
Don’t worry about the sanding making an uneven oil coating – it will all even out once you start oiling again.
Next steps: Finishing the handle
Once the varnish is gone, you should continue to repeatedly oil the handle for a durable and lasting finish. It will also feel better in hand.
I have a full step-by-step article on the proper way to oil an axe handle with a couple of tricks I have not seen listed anywhere else.
The common adage for oiling a handle is:
Once a day for a week
Once a week for a month
Once a month for a year
Once a year going forward
Most people honestly aren’t going to stick with that so I have found that at least 5 times is a good realistic minimum, leaving 12-24 hours between coats. But more coats are better.
After you have fully oiled the handle you can also consider adding a protective wax coating. Wax adds a bit of softness and grip that just feels great in hand and keeps out any moisture or dirt.
We also have an article on making your own tool wax here. I mostly use mine for axes so the article says “axe wax”, but it works for any wood or metal tools.
About the author:

About the author:
Jim Bell | Site Creator
I’m just a guy who likes axes. I got tired of only finding crap websites, so I set out to build a better one myself.
I’m also on Instagram: @axeandtool
Great article, I was looking for info on removing finish from new handles I’ll be receiving. Thanks for th advice and sharing your experience. Mora Kniv are great companions for almost any shop project… m
The Council Tool may have a little wax on it, but should be fairly clean from the factory. The Cold Steel on the other hand is going to need some scraping for sure. And yes – gotta love the Mora knives, I have them tucked all over the place, because they always come in handy.
Same here, found th little Eldris are handy and make great gift. Have you had experience or read about Marbles? Just saw this today: https://www.smkw.com/marbles-american-hickory-hunters-axe
At $21.50 seems a deal and NO handle VARNISH !
Marbles is a classic vintage brand, but I don’t know who makes them anymore. I suspect someone bought the name hoping to capitalize on recognition. So no experience with the modern Marbles, but I would be suspicious of the quality for that price. You can’t make a decent tool, and have a profit, and sell it for $20.
Yup. Same with their wood chisels. Check out throw extended review of CS Trail Boss: https://eclecticoutfitter.com/2022/07/31/cold-steel-trail-boss-review-my-favorite-ax-by-far/
Very good… m