How to Make an Axe Handle – A Detailed Guide With Pictures
This is just a hobby, but if you buy through a link I may get a commission that supports the site. Thanks!
This article will walk through the whole process of making an axe handle from start to finish. It can be done with as little as a saw, a knife, and sandpaper. However, there are a couple of inexpensive tools that will speed things up and make it much easier.
The handle I’m making is small (easier for pictures), but it’s the same process for full-size handles or any others in-between.
Recommended Tools:
You don’t need to go out and buy a lot of new tools for this, and it can be done with as little as a knife and sandpaper. But, it won’t be fast or easy.
Rasps for shaping the handle:
The best tools for shaping the bulk of the handle are rasps. They remove wood in a controlled manner and are easy to learn quickly.

Any large rasp will do, but I like this saw rasp for rough shaping. It has large open teeth and can remove a lot of material very quickly without clogging up. It’s around $30US. I use this rasp for shaping the majority of the handle.

These 4-in-1 rasps have both a flat and rounded side, in both fine and coarse textures. It’s great for quickly smoothing out rough spots and working on curved areas like the shoulder, grip, and palm swell and only costs around $10US.
Additional Tools:
Sandpaper (Fandeli bulk packs are a great value)
For Hanging the Head:
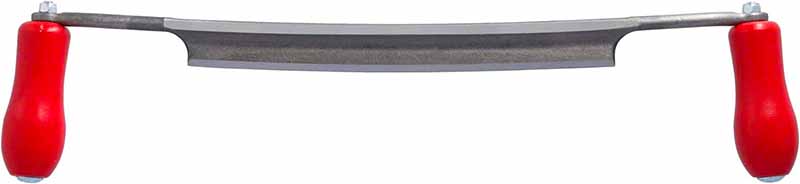
A drawknife can be fast (once you’re good) and is traditionally the “right” tool for this job. It can both remove material quickly and also be precise. There is a bit of a learning curve – but it’s not that difficult.
Additional Tools:
A 3-4lb dead-blow hammer or mallet is best for seating the head on the handle when hanging. A metal hammer can crack the wood and ruin your work.
Step 1. Choose the Right Type of Wood
Unfortunately, standard lumber isn’t suitable for an axe handle so you often can’t just go to Home Depot.
For axe handles over 16″ you need a species of wood that is both strong and flexible enough to withstand use. Many hardwoods are strong, but they can’t all withstand the forces of bending and impact. Your choices are limited.
| Hickory | The industry standard for axe handles. It is widely available and is one of the strongest and most flexible woods. Hickory ranges from pale yellow sapwood to reddish medium brown heartwood and has a medium texture. |
| Ash | Likely the second most common wood for axe handles. Ash is not quite as strong as Hickory, but it’s about 15% lighter. This makes it feel a little “whippier” in hand. It’s straight-grained, light brown has a medium texture, and is easy to work with. |
| White Oak | Also has a history of being used by handle makers. It has a similar strength to Ash but is a little more firm. It has a coarse grain which naturally provides more grip texture. It’s a light brown with a slight olive hue. |
| Elm, Beech, Birch | Traditionally used in Europe (before Hickory from North America was available). All three are fairly easy to work with, but are not as strong as the woods above. Elm is the weakest. |
There are a few studies on wood strengths that are often quoted that support the woods used in axe handles. However, they don’t always account for the sudden impact axes are exposed to, so be wary of straying to other species that might “look good”.
You have more options for Hatchet Handles
If you are making a hatchet handle 16 inches or under the wood still needs to be strong, but there’s a lot less flex to worry about.
Most hatchet handles are still made from Hickory, but most medium-to-hard hardwoods should be acceptable (even if they aren’t as strong). Maple, Walnut, Black Locust, Cherry, Apple, and many others can be used.
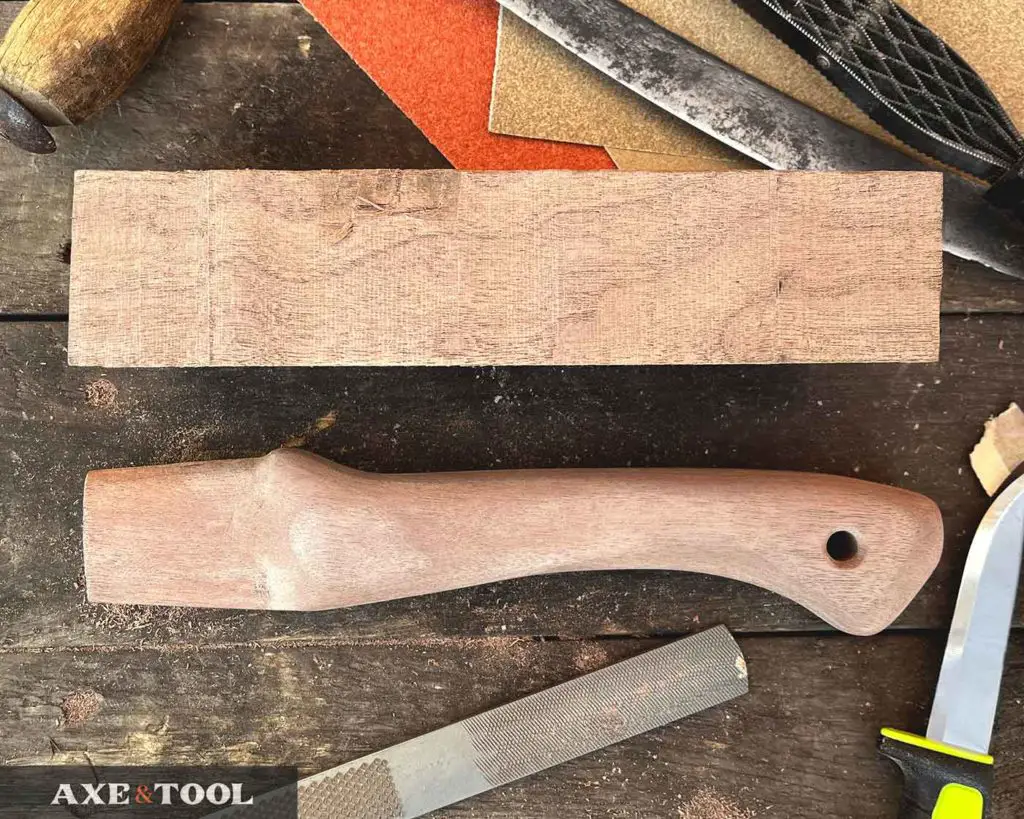
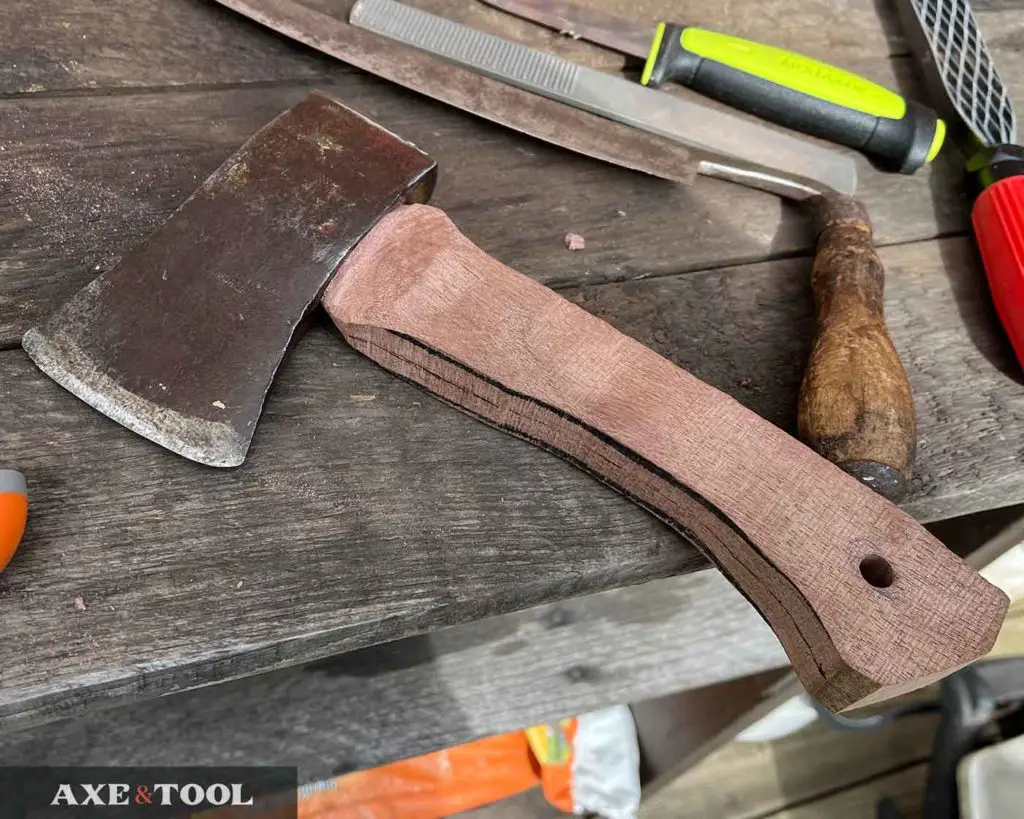
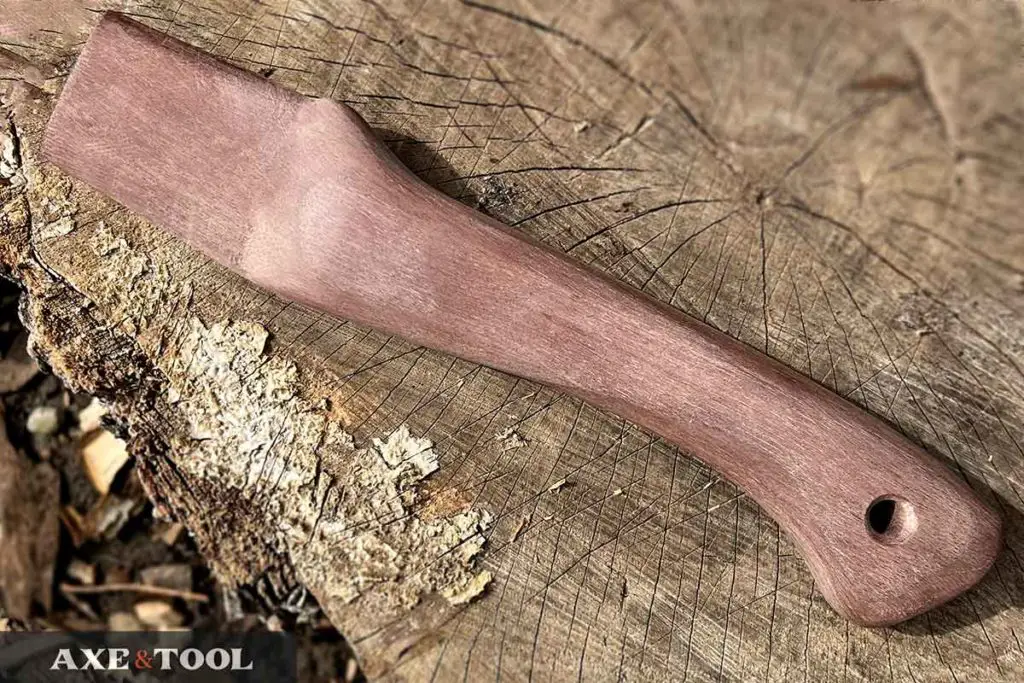
The handle I am making in this article is Black Walnut.
Do not use softwood for axe handles
You should not use softwoods (evergreen trees) like pine or cedar to make any handle. They aren’t strong enough. And avoid any soft hardwoods like Poplar. Poplar is commonly used for the wedge of an axe but is too soft for the handle.
Do not use greenwood for axe handles
Do not use green (fresh-cut) wood for axe handles. Axe handles need to be made from properly seasoned lumber. When greenwood dries it shrinks, and will often crack or bend. Which will ruin the handle in a matter of months.
Hickory shrinks about 7% when dried, so an axe would come loose even if it didn’t crack or bend.[1][4]
You can make a handle straight from a log, but
Step 2. Choose The Right Piece of Wood
Once you have picked the species of wood, there are still more considerations to make sure you select the right piece of wood. Similar to the type, the longer your handle is the more these details matter.
Grain orientation in axe handles
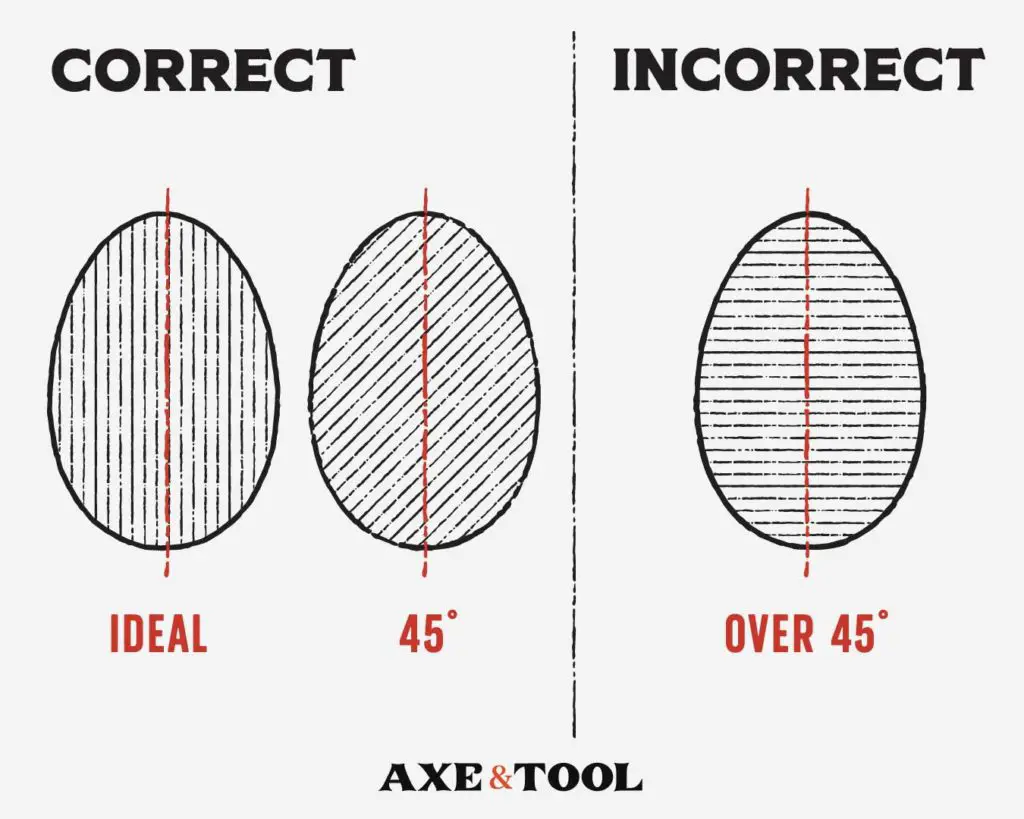
The grain should be fairly straight, running parallel with the direction of the axe. It can be at an angle, but shouldn’t be more than 45°. This will reduce the chance of the handle breaking along the grain as it flexes in use.
This is considered a best practice but may be overblown – especially for short handles. According to Gabriel Brånby (previous owner of Gränsfors Bruk), American Hickory is strong enough that orientation doesn’t really matter[5].
Custom axe maker Hoffman Blacksmithing claims they have done a test proving it doesn’t matter on short handles under 24″.[6].
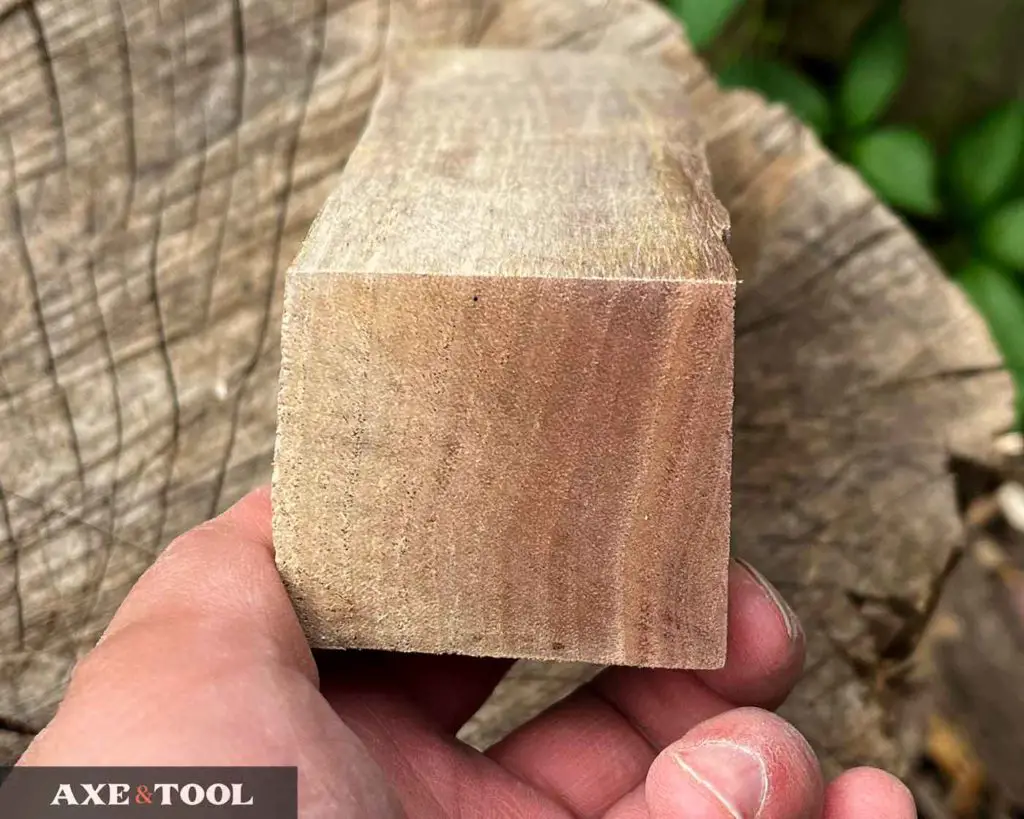
Don’t forget to check for grain runout

Ensure the majority of the grain runs all the way through the handle and doesn’t run out in the middle. If you just look at the end, a piece of wood can look perfect even if the grain runs curves dramatically. This is worse than having the wrong orientation (I have made this mistake before).
A little runout is fine (and unavoidable), but you do not want the grain to cut across the width of the handle.
Sapwood vs Heartwood doesn’t matter
Handles can be Sapwood, Heartwood, or a mix of both. Sapwood is lighter from the outer rings of the tree, and Heartwood is from the darker core. The USDA did 2 studies in 1936 and 1966 on the differences between sapwood and heartwood and determined there is no meaningful difference.[7,8]
Avoid Knots in an axe handle
Knots twist the grain and become a weak spot that can interrupt the flexibility of an axe handle. Knots should be avoided, but the size and placement of the knot will determine if it’s a serious flaw.
A knot at the end of the handle is less of an issue as the flex happens in the middle (but it’s still not ideal). And a few small pinhole knots can be excused, even if they are in the middle – they won’t weaken it too much.
Board dimensions
Your board needs to accommodate the eye, any curves in the handle plus the extra width in the palm swell.
Length (top to bottom): Whatever you want
Width (side to side): 1″ minimum, 1.5″ is ideal
Depth (front to back): 3-4″ depending on the design
You can widen the palm swell on a 1″ board by gluing on (laminating) additional pieces, which also has the benefit of taking less work to thin/shape the handle.[9]
Step 3. Draw or Trace the Shape
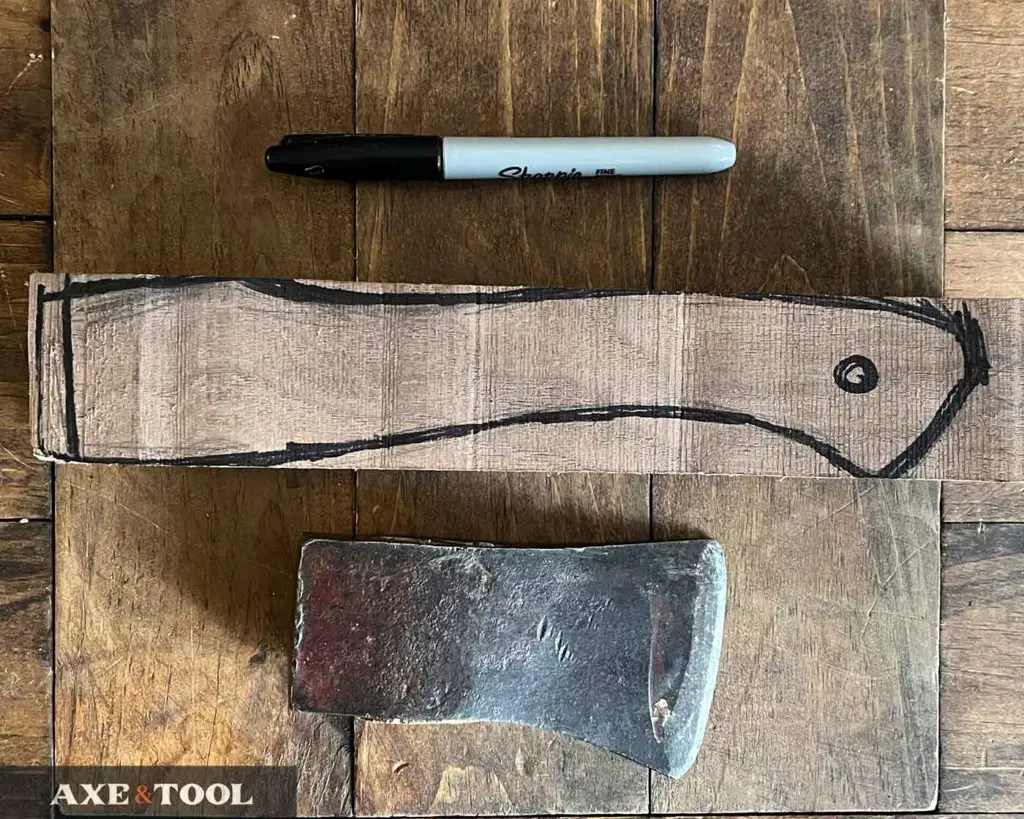
Create an outline on the side of the wood by tracing an existing handle, using a template, or just by doing it free hand.
Draw slightly larger than the original handle leaving a little wiggle room for when you’re cutting it out if you make any mistakes. Remember, you can always remove more material, but you can’t put it back.
Leave the bottom of the grip flat
You need to leave a flat spot on the bottom of the handle that will be used to hammer on when hanging the axe.
This can be rounded or shaped after the head is hung but should be left flat until then.
Step 4. Cut Out the Handle
Once you’re happy with the shape of your handle simply cut it out.
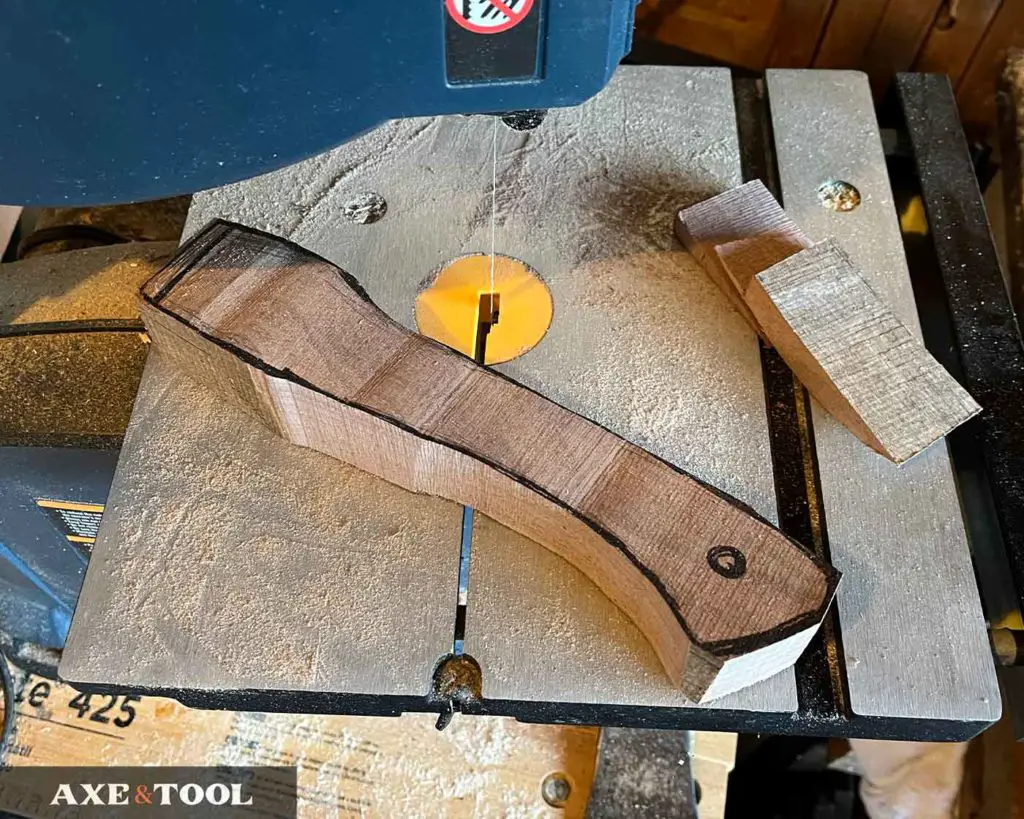
If you have a bandsaw this can be a pretty quick and easy task. But a handsaw will do it too. I’ve done more handles with a handsaw than the band saw.
Tip: When using a hand saw, it can be useful to add a series of relief cuts into curved areas. That will take some of the pressure off the saw blade while you’re cutting it out. Or you can use a chisel to pop out the wood between the cuts.

Step 5. Shape The Eye
If you don’t have an axe head yet, leave the eye roughly shaped until you do. It’s better to keep the end larger than needed, as eye sizes vary.
It’s easiest to shape the eye while the sides of the handle are flat. You can clamp it down securely without scuffing the finished handle, and better gauge your alignment.
This is probably the trickiest part of carving a handle and hanging an axe. I do it early so I haven’t wasted a lot of time if I mess up.
Trace the eye and add a center line
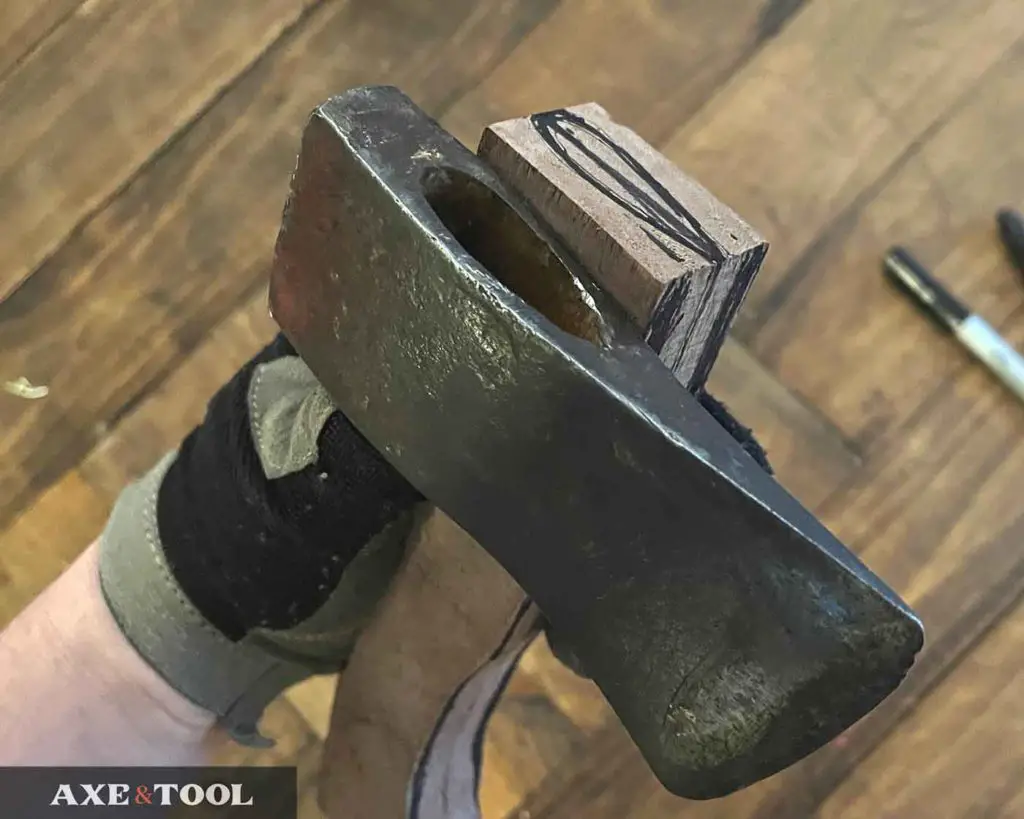
Draw a center line on the top of the wood, and then trace the axe eye onto the top as a guide.
It can be useful to draw a line down the middle of the entire handle to help gauge if your hang is straight. It also gives you a guide to work with while shaping and rounding the handle.
Start to remove material
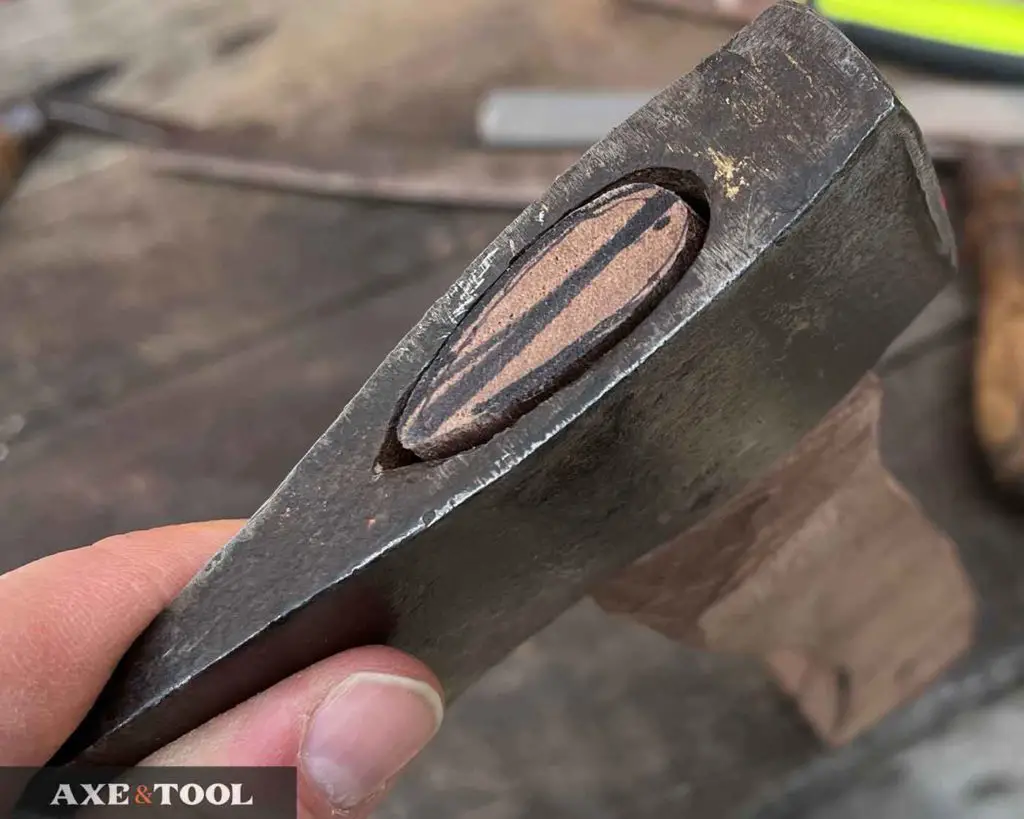
Slowly begin shaving or rasping the end of the handle to fit in the axe’s eye – regularly testing for fit and alignment. Look for gaps and check that the head is straight and centered.
You want the head to be snug on the handle, and the shoulders should taper gently into the eye. It should not look like it’s sitting on a “shelf”, as this can wear down with age and cause the axe to come loose.
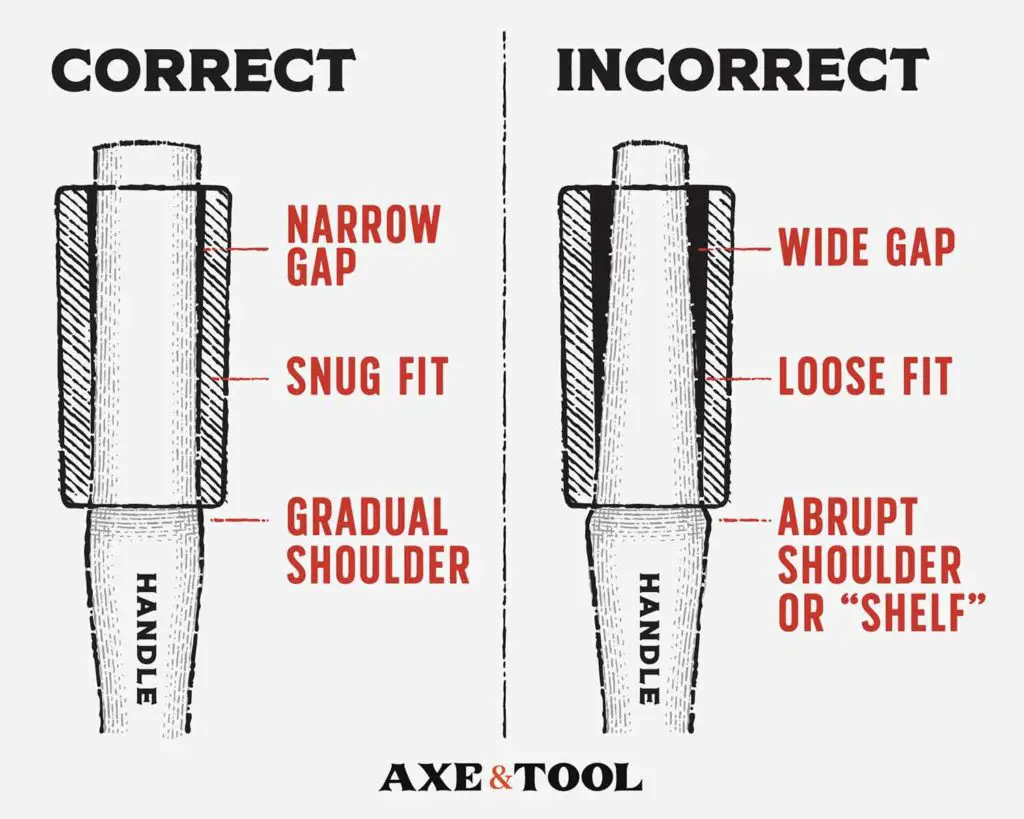
The hole at the top of the axe head should be slightly wider than the bottom so it’s okay if there is a bit of a gap around the top. That space will be filled in when you hammer in the wedge to hang the axe for good.
Tools you can use to shape the eye:
You have a few options for tools when it comes to the eye.
Option 1: Drawknife
A drawknife can be fast (once you’re good) and is traditionally the “right” tool for this job. It can both remove material quickly and also be precise. There is a bit of a learning curve – but it’s not that difficult.
You can get a new drawknive, or often find vintage draw knives on Facebook marketplace or at flea markets for a decent price.
Note: Make sure you are getting one with a fine blade – not a heavy one for stripping bark (they look similar).
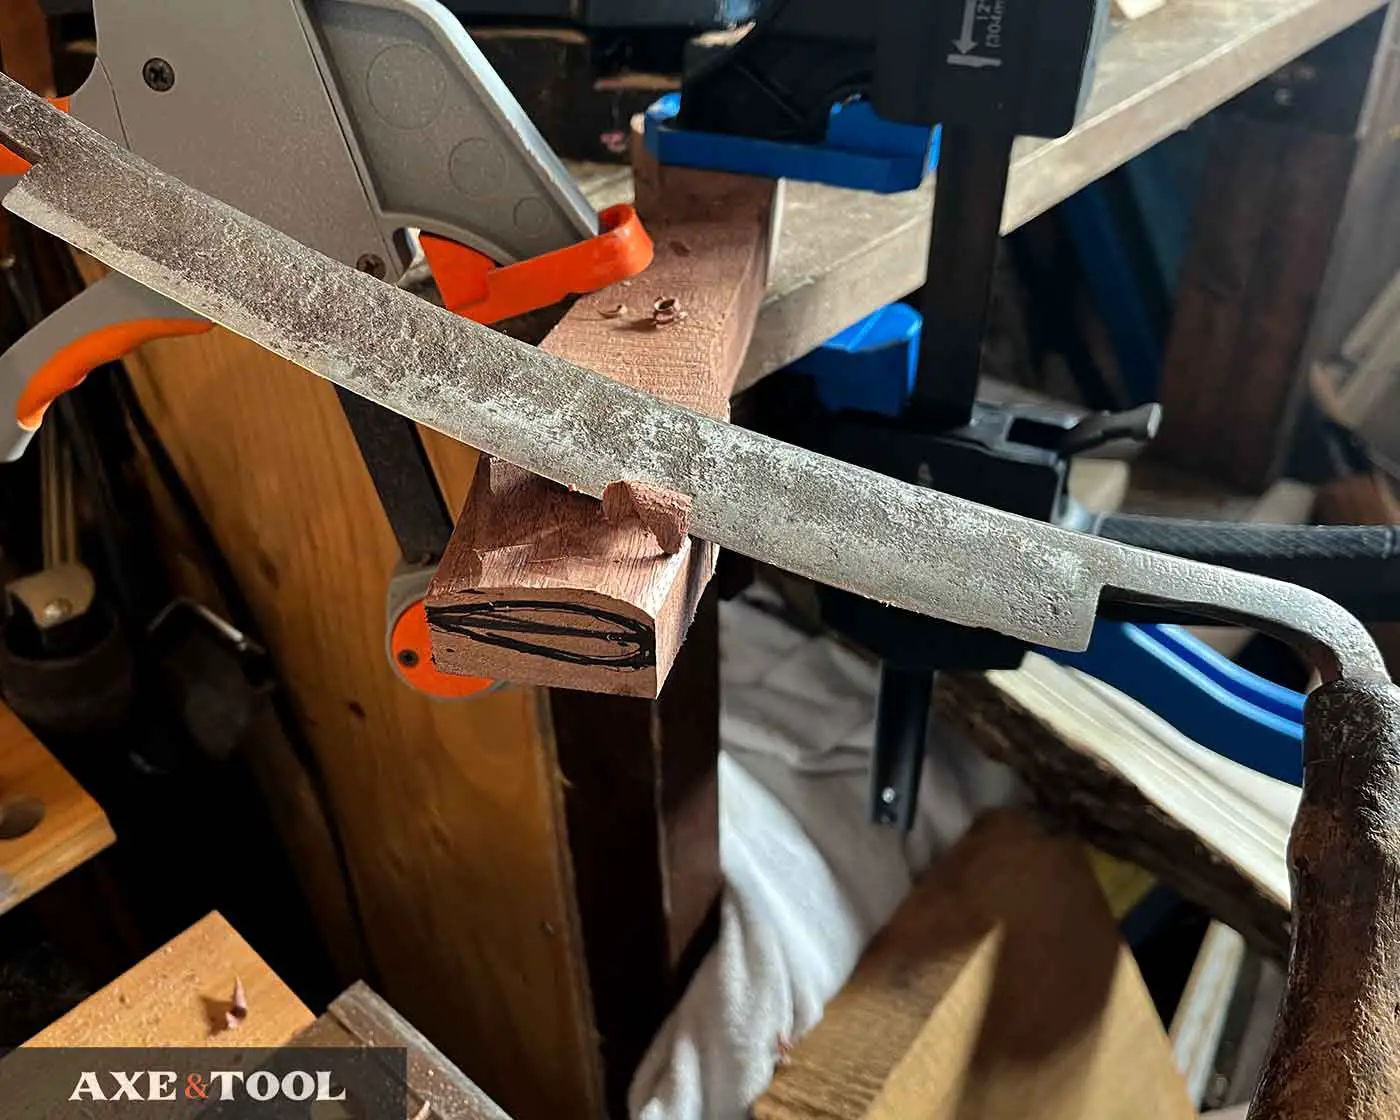
Option 2: Rasps
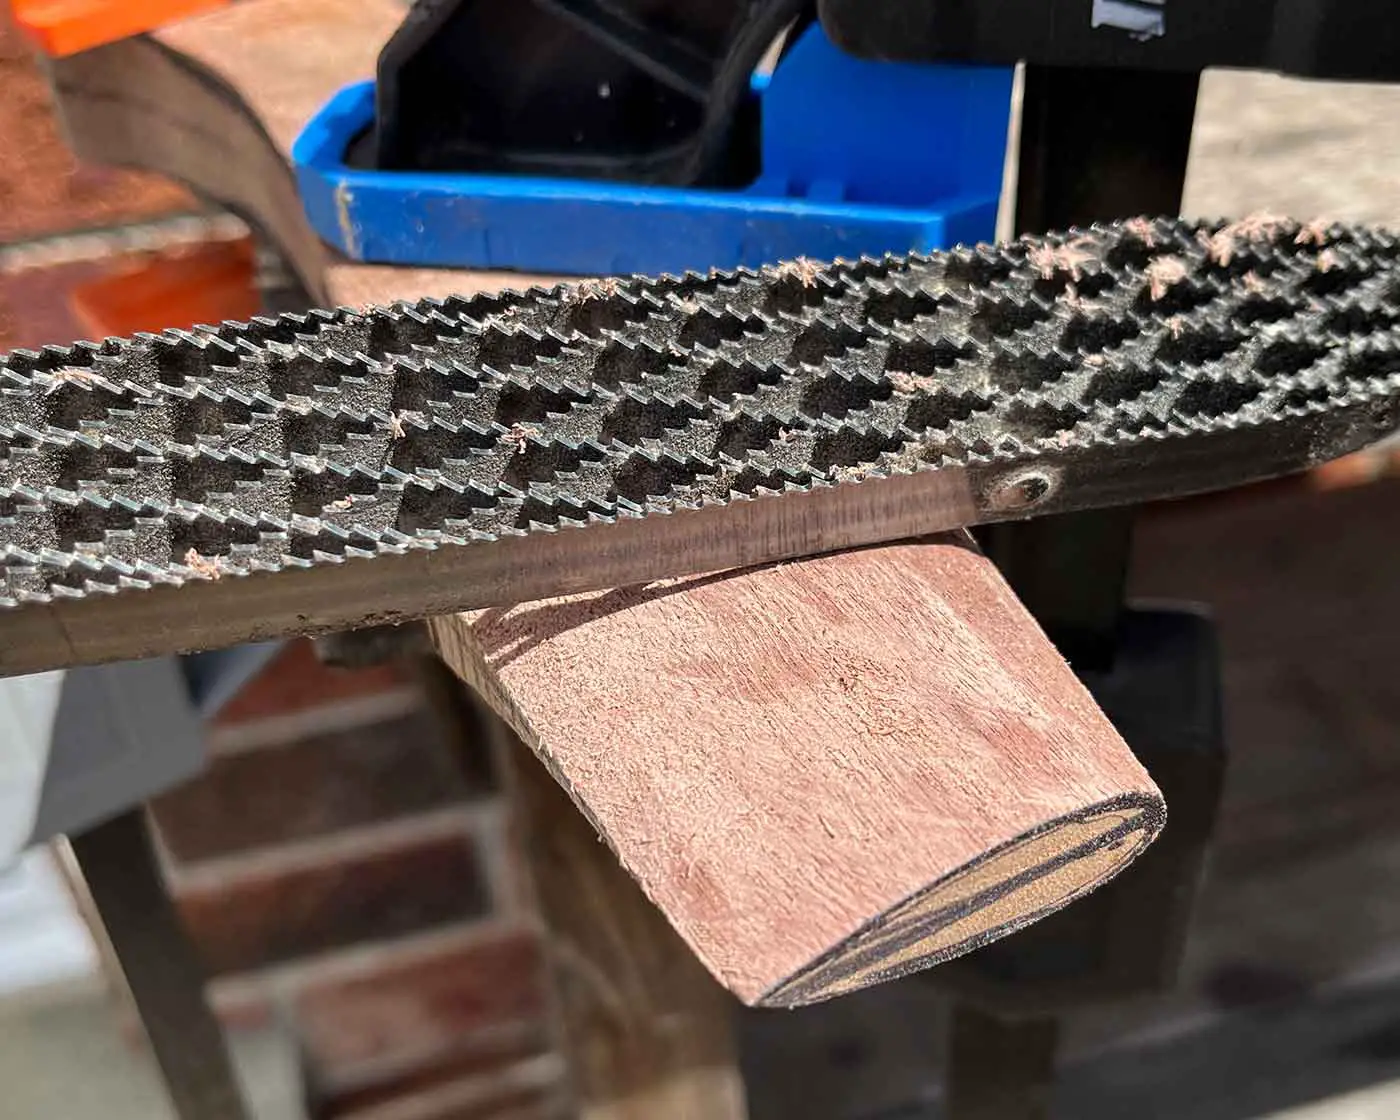
Rasps can shape the eye and are easier to learn quickly. Plus, rasps will be useful in shaping the belly and grip of the handle.
I like pairing a saw rasp with a 4-in-1 rasp. And I recommend buying these two tools for making axe handles before going for a drawknife. They can be used for more tasks (and both can be had for less money than a single drawknife)
Option 3: A Knife
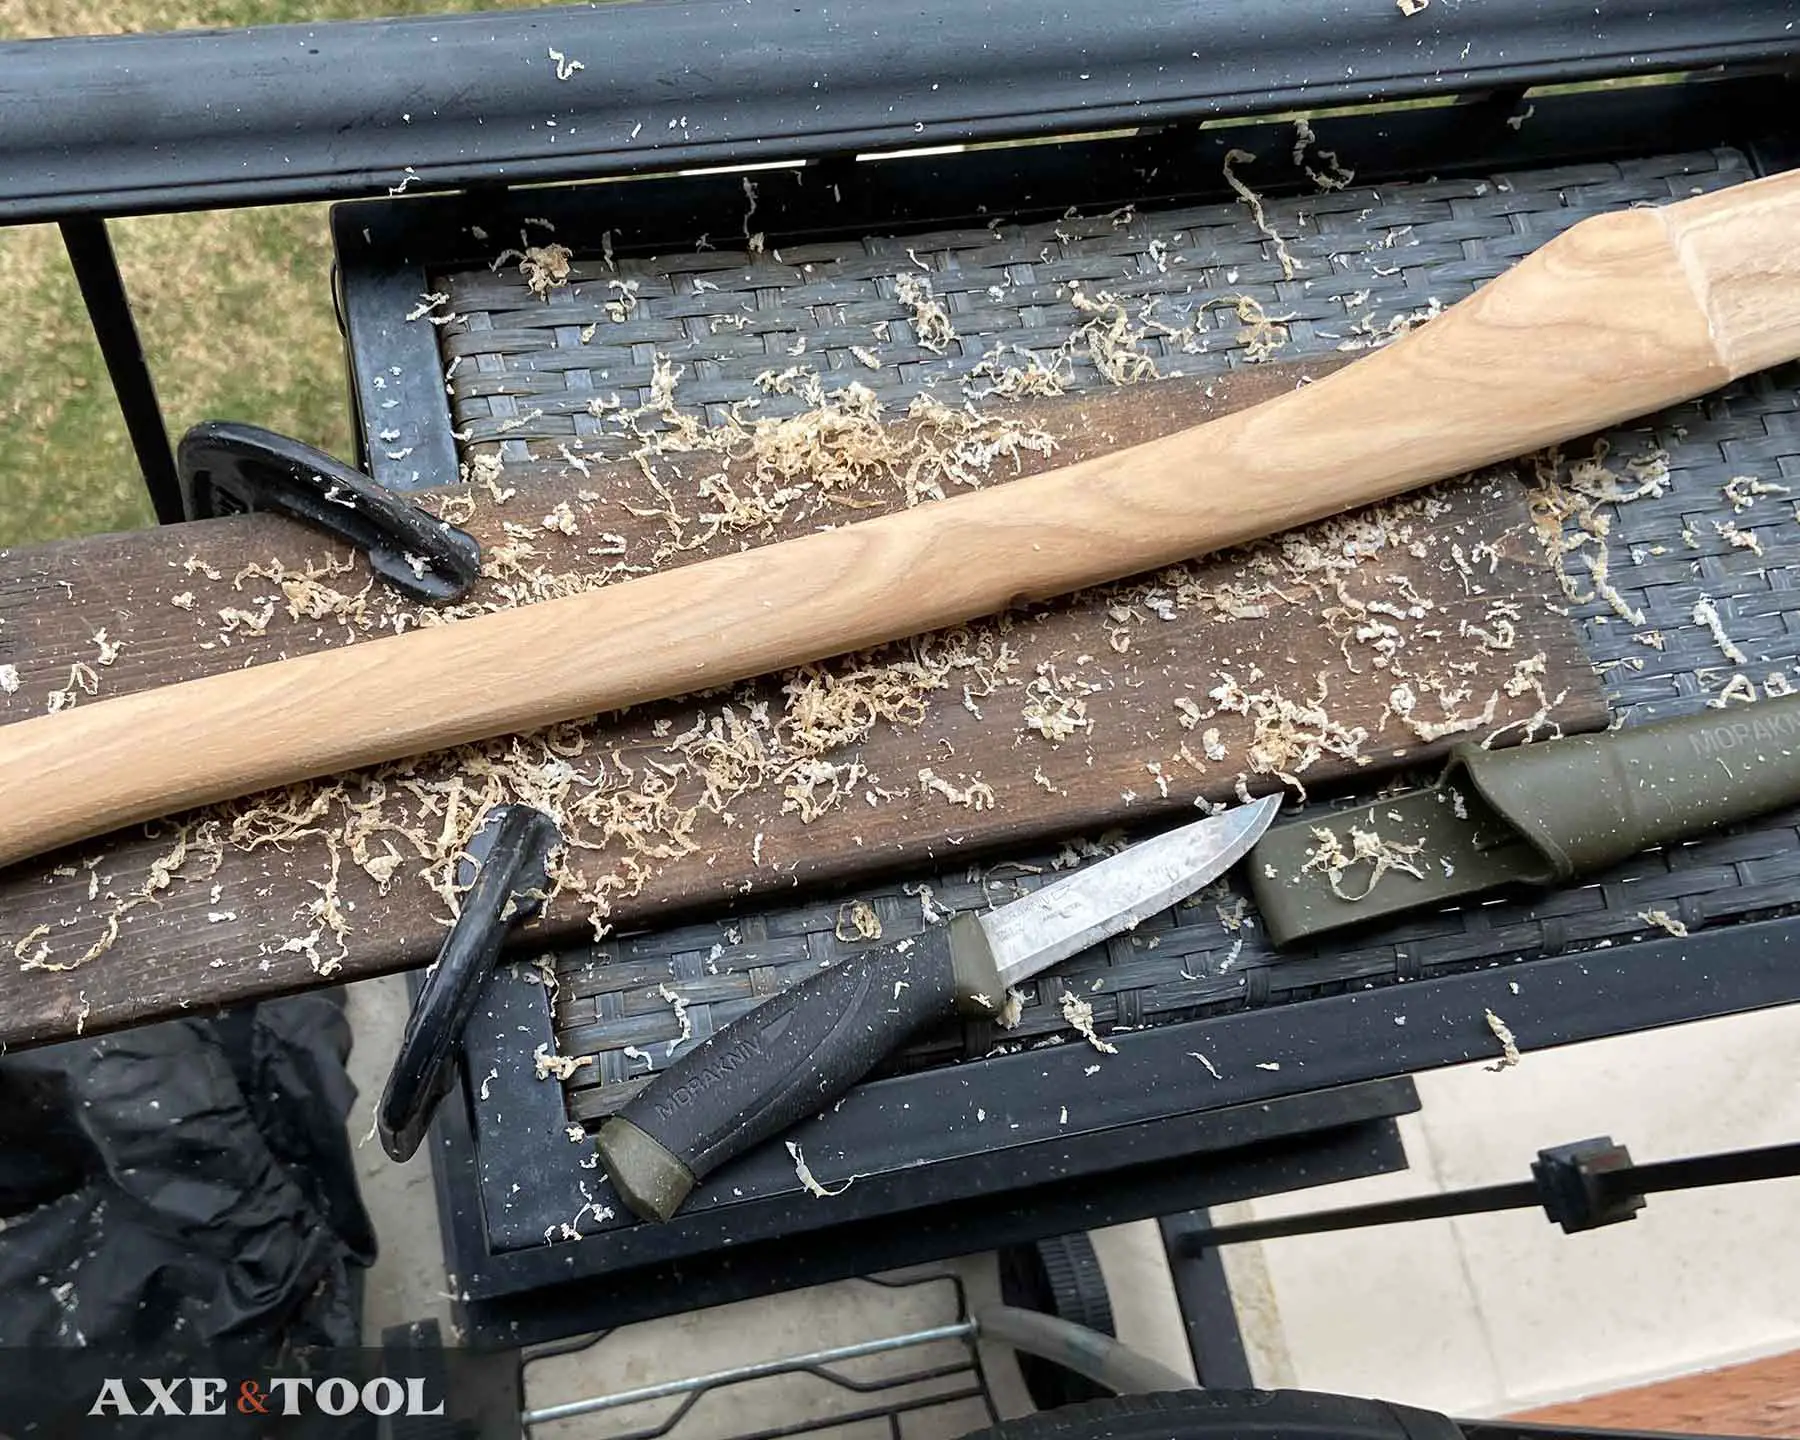
This is doable with just a knife. I carved my first few hatchet handles with just a $15 Mora knife. It’s not fast, or easy – but it’s doable.
You can carve the bulk of the shape, and then scrape the sides with the knife to help smooth the surface.
Test the Fit as You Go
Stick the head firmly on the handle by hand and turn it upside down. Hit the flat spot with a mallet to seat it tightly. Small curls in the wood where show you where you need to remove material.
Tip: A weighted mallet or dead blow hammer is better than a standard hammer, as a metal hammer is more likely to crack the wood. I use this 4lb dead blow from amazon.
This will likely take a lot of trial and error before you get it all the way down. This is where the saying “getting the hang of it” comes from.
Take it slow and don’t remove too much material. Remember you want to make sure it stays snug.
The end of the handle should stick out the top of the head at least 1-8″ to 1/4″.
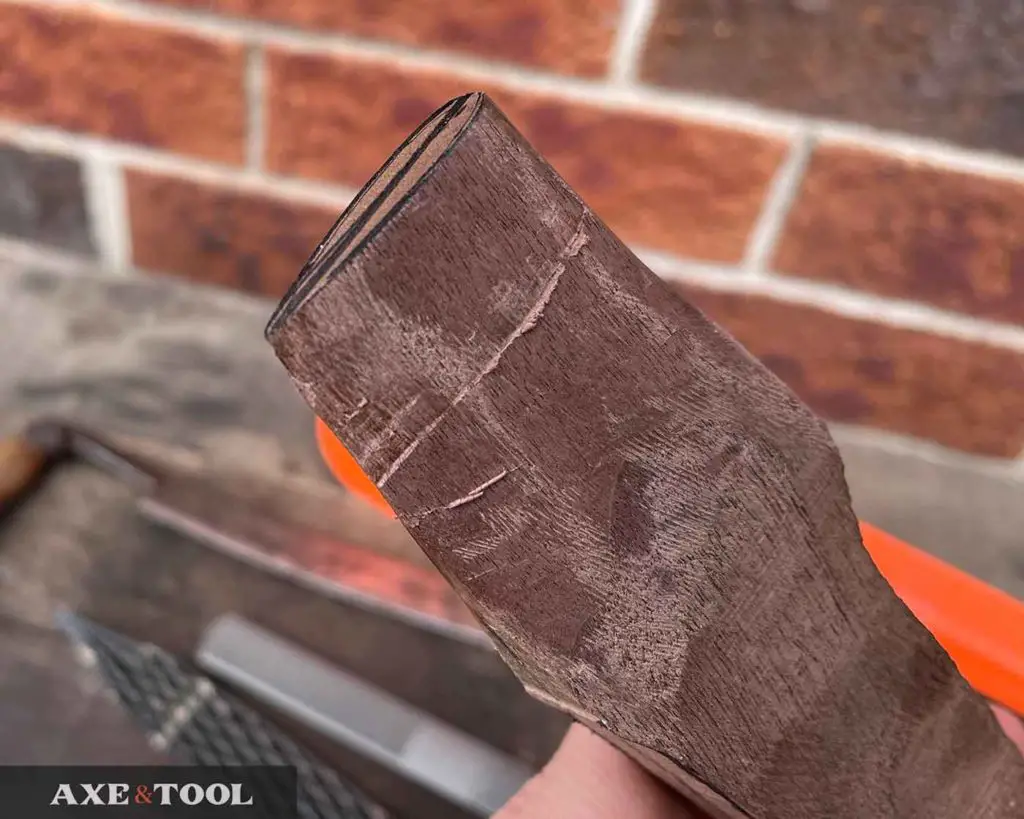
Step 6. Cut the Kerf
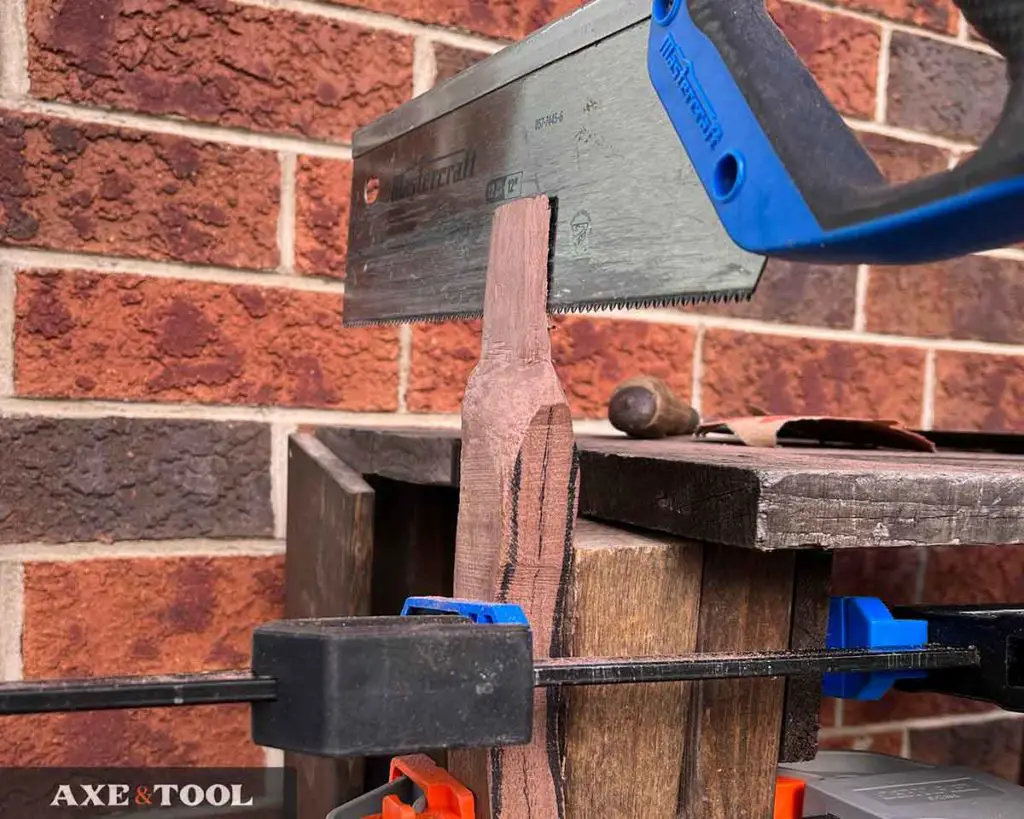
The kerf is the slot at the top of the handle where you’ll hammer in the wedge to hang the axe. It should go about 2/3 of the way down the inside of the axe head.
I find this easiest to do with a handsaw, as band saws can have too much flex (I’m not good with a bandsaw).
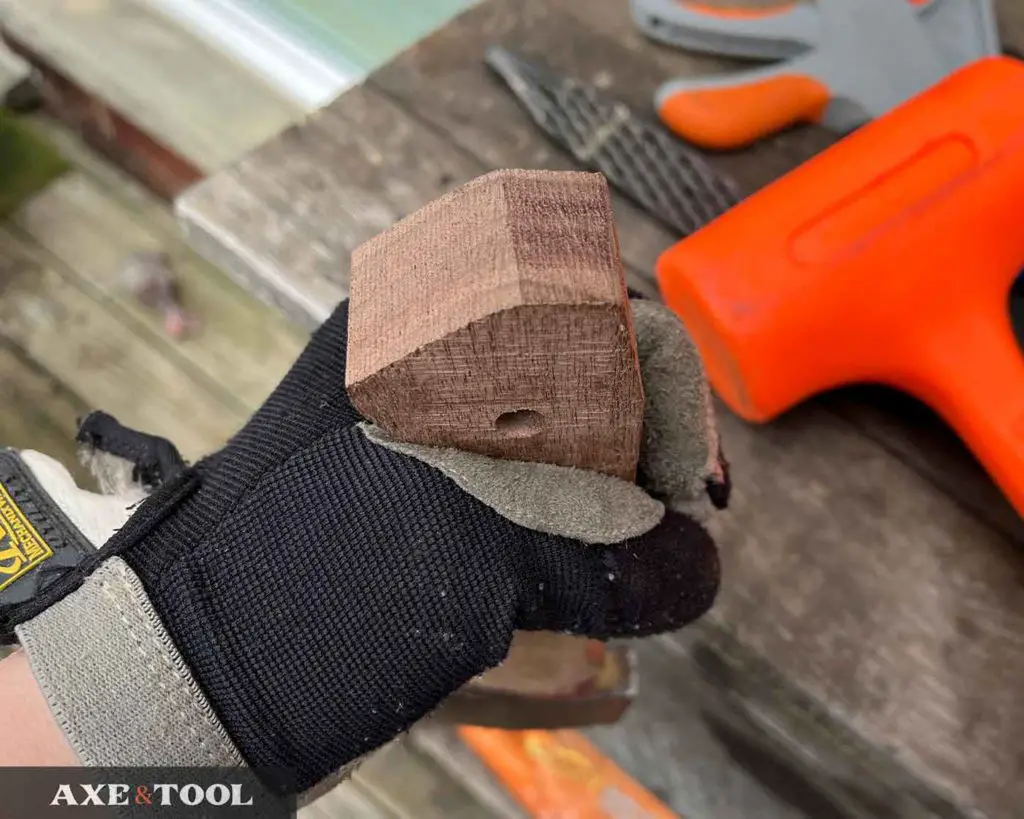
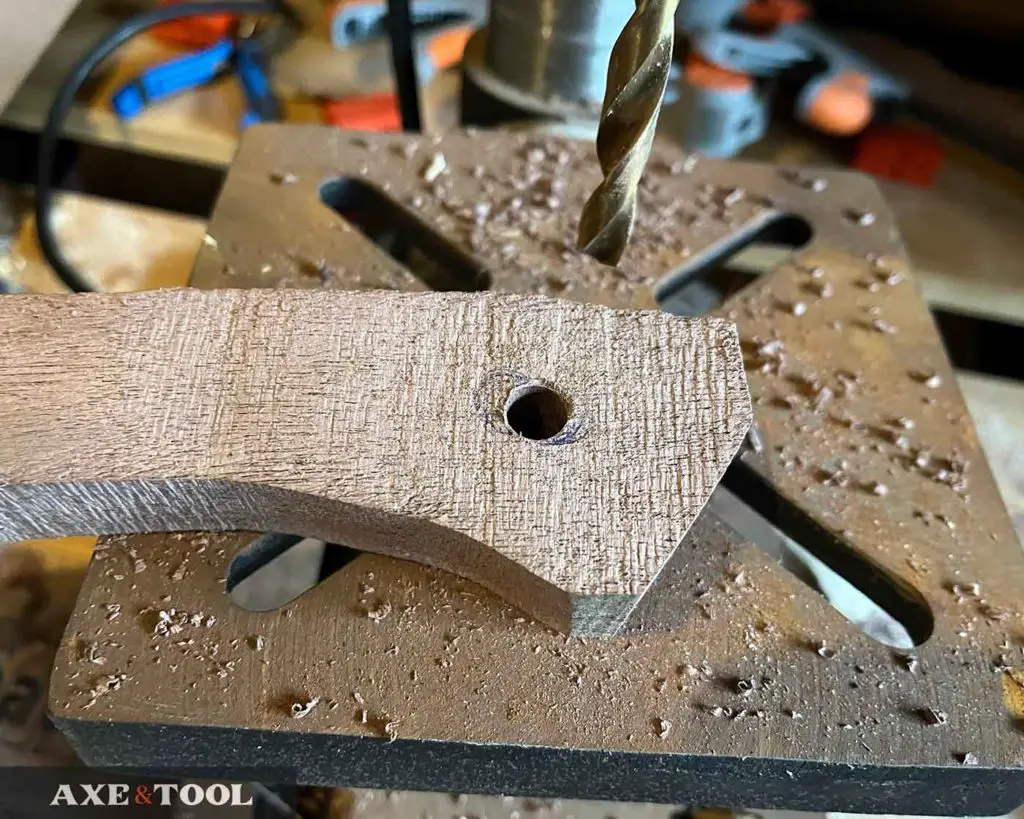
Drilling a Lanyard Hole
If you are going to add a lanyard hole – do it now while it’s easy to lay the handle flat on the workbench.
I typically use around a 3/8″ bit.
It is best to chamfer (bevel) the lanyard hole to avoid cracks, damage, or fraying of the cord. But this is done at the end once the handle is fully shaped.
Laminating the palm swell (optional)
If your wood is thin, you can glue extra pieces to either side to widen the palm swell. Simply glue and clamp the extra wood on either side, then let dry.
Once that’s done, trim any overhangs and shape with the rest of the handle.
Note: I have not tried this yet, but it’s quite smart. And you can find beautiful examples on Axe & Edge Tool Co‘s Instagram (here).
Step 7. Shape the Handle
You should have an axe handle-shaped piece of wood capable of being hung. You just need to give it shape and thin out the belly of the handle.
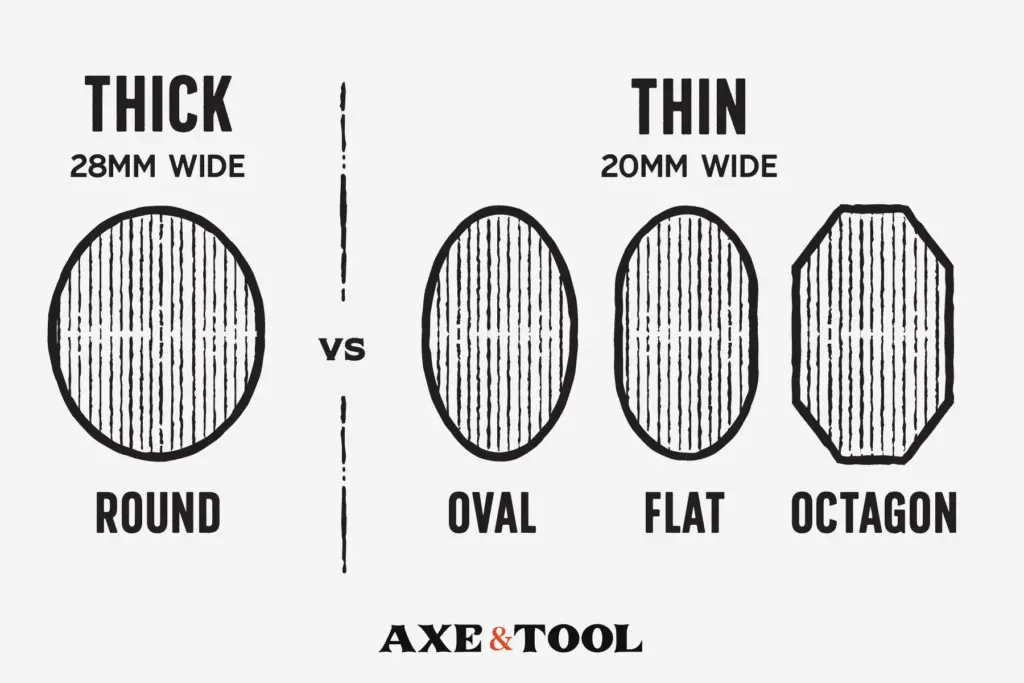
While most store-bought axe handles come quite thick – a traditional width for a properly thinned handle is 19mm – 21mm (0.75″ – 0.825”).
You can leave it a little thicker for splitting axes, but in general, I tend to like the 20-21mm.
The shoulder needs to remain a little wider to support the head (which is why we hang the axe first), and the palm swell should stay nice and wide to stop your hand from sliding off (more on that below).
There are three typical profile shapes for a thinned handle, but it’s just a matter of preference. Some people like flatter sides, others rounded. The octagonal shape is also a classic but is the toughest to achieve.
Consistency is key, which is why I highly recommend using rasps. They will be better at running down the entire length of the handle keeping a straight and even stroke.
Again the combo of the saw rasp to remove a lot of material quickly, and a simple 4-in-1 to smooth and shape any curves in the grip or shoulder.
This can also be achieved with something like a spokeshave, or again even just a simple knife.

If you just have a knife, it’s going to take longer but it’s doable. Instead of cutting with the blade though you’re going to be scraping down the handle with it to pull off shavings.
Do not use a draw knife and be careful if you plan to carve the rest of the handle with a knife. Hickory tends to tear and you’re going to run into issues with the grain direction. (I have a pic in this article on thinning handles)
Shaping the palm swell
While the majority of the handle should be consistent, the palm swell needs to flair out at the front and sides to catch your hand and prevent the axe from slipping.
You want the sides to flare, rather than bulge out to better stop your hand. If the curve is reversed into a bulge it’s easier for your hand to slide off.
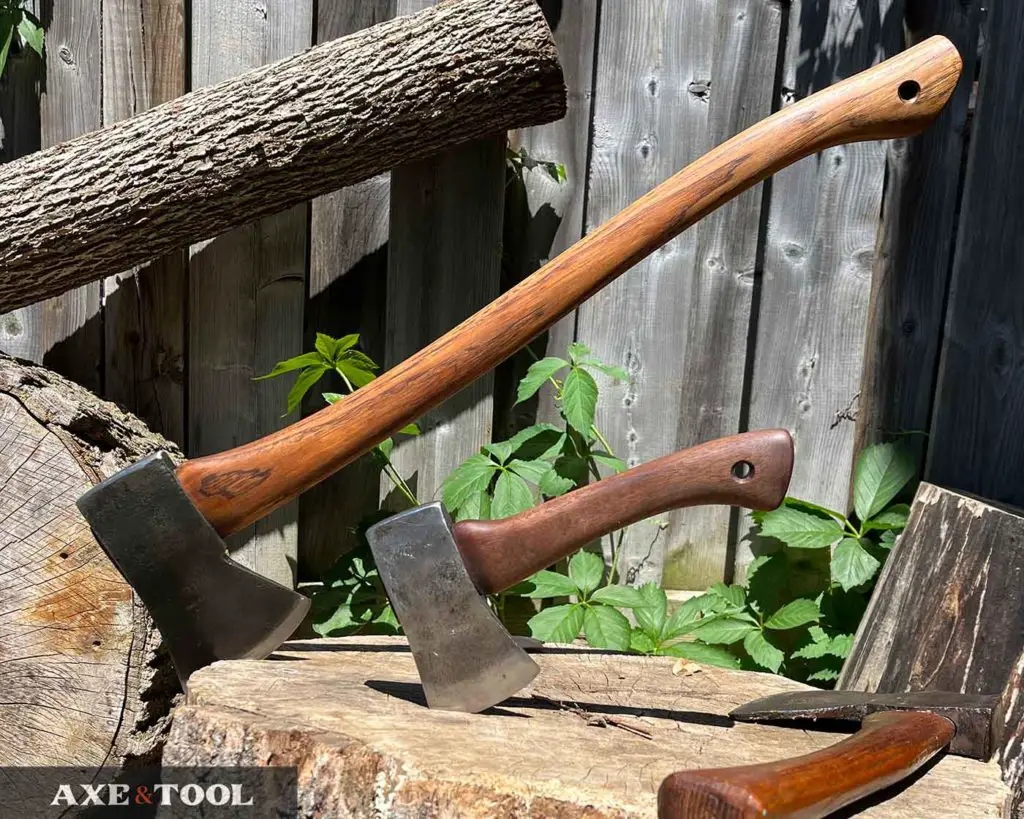
The swell can flare out as much as twice the width of the handle – the example below on the right is a 36″ handle from the 1920s.

Bevel any sharp edge
Any edges (like the bottom of the palm swell) should be chamfered (beveled) to reduce the chance of cracking if dropped. It’s also more comfortable in hand.
You can see on the palm swells above that they taper back in on the bottom.
For the edges, you can use the flat side of the 4-in-1 rasp, or even just course sandpaper taped to a piece of wood.
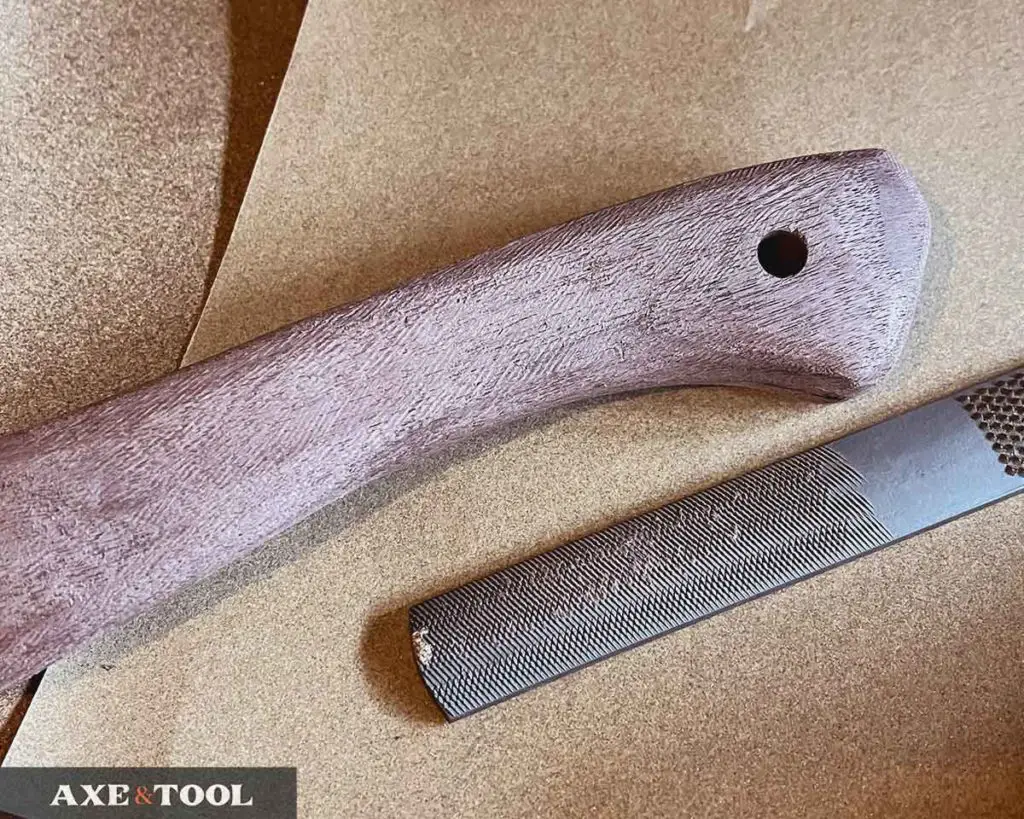
Chamfer the lanyard hole
For the lanyard hole, I use a cheap counter sink drill bit, but you could probably just roll sandpaper in a pinch. This step can be done now or after sanding (I did mine after sanding for this one).
Step 8. Sand the Handle
Finally, it’s time to smooth and finish the handle.
Rasps will leave teeth marks all over the handle which need to be sanded away. You can do some preliminary smoothing with the fine sides of the 4-in-1 rasp but you are going to need sandpaper to finish it off
Stage 1: 60 grit (coarse) to get rid of the rasp marks.
Stage 2: 100 grit to smooth out the entire handle. You may find you need to go back to the 60 grit again, as some rasp marks do really become noticeable until you have smoothed out the surface.
Stage 3: 220 grit for the final pass.
Some like to leave the bottom textured only to 100 grit, or even with the rasp marks for more grip.[10] But I tend to smooth everything.
I use bulk packs of Fandeli sandpaper – they are a way better value than at the hardware stores (and good quality).
Now, your handle is done and ready to hang.
Step 9. Hang and Finish the Axe
It’s best to do any final cleaning or sharpening of the axe head before you hang it on the handle.
Once your axe is hung you can go back and reshape the palm swell if desired. You can see below that I rounded the bottom.
I don’t usually do this, but for these little hand hatchets, you often want to grab the very bottom to squeeze a little more reach out of it.
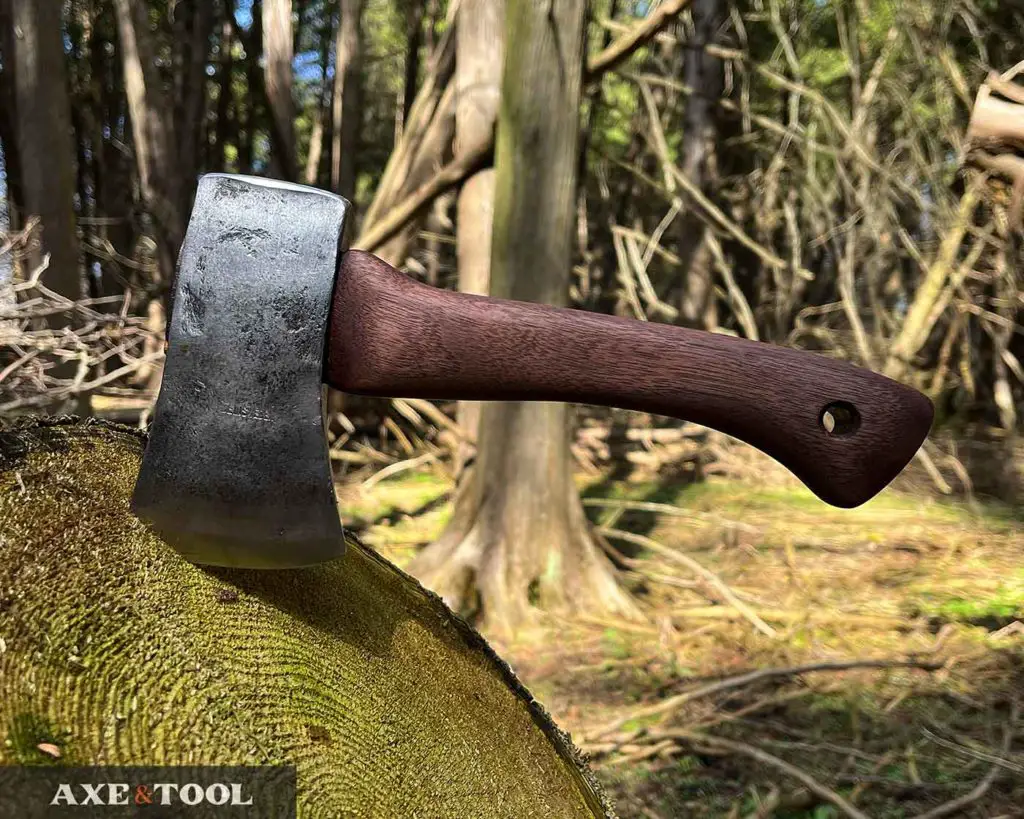

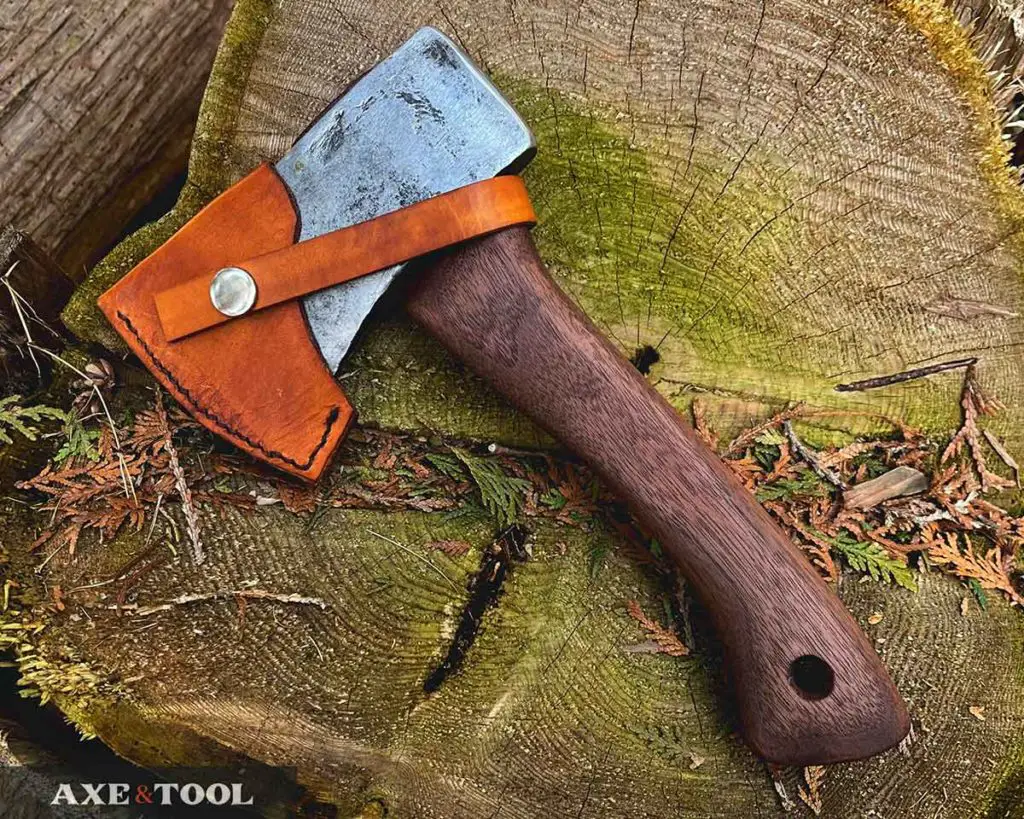
After the axe is done, don’t forget to oil your handle. It’s important for keeping your axe strong, and greatly improves the look of the wood. I have full instructions with tips here.
Please comment below If I missed something or if you have any questions. I do my best to respond to everyone.
About the author:

About the author:
Jim Bell | Site Creator
I’m just a guy who likes axes. I got tired of only finding crap websites, so I set out to build a better one myself.
I’m also on Instagram: @axeandtool
Resources
[1] – USDA – Strength And Related Properties Of Woods Grown In The United States (1935)
[2] – Bushcraft USA – 183764, Summary of USDA Testing
[3] – Bushcraft USA – 184377
[4] – Wood Database
[5] – Canadian Outdoor Equipment Company, Question to Gabriel Brånby
[6] – Hoffman Blacksmithing Premium Axe Handles
[7] – USDA – Sapwood vs Heartwood (1966)
[8] – USDA – Sapwood vs Heartwood (1936)
[9] – Axe & Edge Tool Co. Instagram
[10] – USDA Forest Service – Axe Manual

Hi Jim B. – I’m recently into the axe hobby as well and am appreciating your site – thank you.
One tool that I did not grow up with but decided to try out is a cabinet scraper, sometimes called a card scraper. Works great at removing tool marks and saves a lot of sanding – perfect after rasping. I think you’d find it useful in this process and pretty enjoyable to use.
Thanks Brian, I actually picked one up about a month ago – but haven’t tried it yet. I’m going to need to make sure I try it on the next one, thanks for the tip!
Where can I by a hickory board? Any idea, local Home Depot doesn’t have it.
I am in Toronto area. Any ideas?
So love your webpages!
Sorry, I’m not sure – I never found any when I lived in TO. None of the big store have anything useful. I can ask around – I know vintedge_tools (instagram) makes his own handles and he lives just north of the city.
RE: Buying hickory for handles;
There are hardwood dealers for furniture, etc., but your best bet is an online seller or a wood specialty dealer like bairdbrothers.com for wood for blanks.
I’ve bought 2 handles, 1 from “HOUSE HANDLE COMPANY” and 1 from the local Lowe’s.
Other online sellers include wateroakforge.com(US), thraneaxeandsawco.com(US), 3riversarchery.com(US), woodworkerssource.com(US) are some I found.
Also etsy.com has blanks, handles & wood sellers. One is
Try an online search for “hickory handle blank near me” for Canadian sellers.
Exactly to the point. Thanks for reducing my workload. Nice work.
Appreciate the comment – thanks!
You show a shim in the end of your completed axe but give no instructions on how to do this.
I think by shim, you are referring to the wedge that locks the head on the axe? This article is just about making the handle, but I have some others that might help:
Guide to Axe Wedges
How an Axe Head Stays on
I’m making an axe at our handicraft lessons in school, this will help alot thanks
Awesome, hope it helps! Have fun.
i just made a couple of maple small axe handles. Nice, nice, nice. And much fun. It took about 3 hours after gluing side pieces on the end of the handles and keeping clamped overnight. Attaching the axe head first is what I have should have done as I work it in a vise and when clubbing the bit on, sometimes it would slip and dent the edge of the handle with the edge of the vise jaw. Good advise about that. I had three heads laying around and wanted to make helves for them for a long time. I am making Native American bows and bought a board of maple at the local hardwood store. So I used part of the wood to make 3 helves and 2 bows. Fun, fun, fun.
Thanks for the comment, glad you found the post useful! Making a bow seems like a lot of fun, I imagine you would have to do some wood steaming for that?
Reply to Jim Bell. No you don’t need to steam for Native American bows, which I’m speaking of. As a guide I used an excellent book by Doug Spotted Eagle, printed in all black and white. Made one by the book and was “set for life” and included my own artistic detail using rattle snake skin, python, and lamb skin for backing. I know this is about axes and hatchets. I have glue drying on the lambskin on my work board. So I started working on a Swedish hatchet head I found at the re-store for a dollar. The head is worth $65 and a hand made helve, the cost of wood and labor=about 100. I have done four axes…dad some laying around my shop. Contact me if you want.